User Roles and Permissions#
AutomateNexus CRM uses role-based access to govern what each user can see and do within the platform. This system ensures that administrative functions are only accessible to authorized personnel while giving everyday users the tools they need to be productive. This guide covers the roles, what administrators can do, workspaces, user management workflows, client organizations, approvals, the audit log and troubleshooting access issues.
Understanding Roles in AutomateNexus CRM#
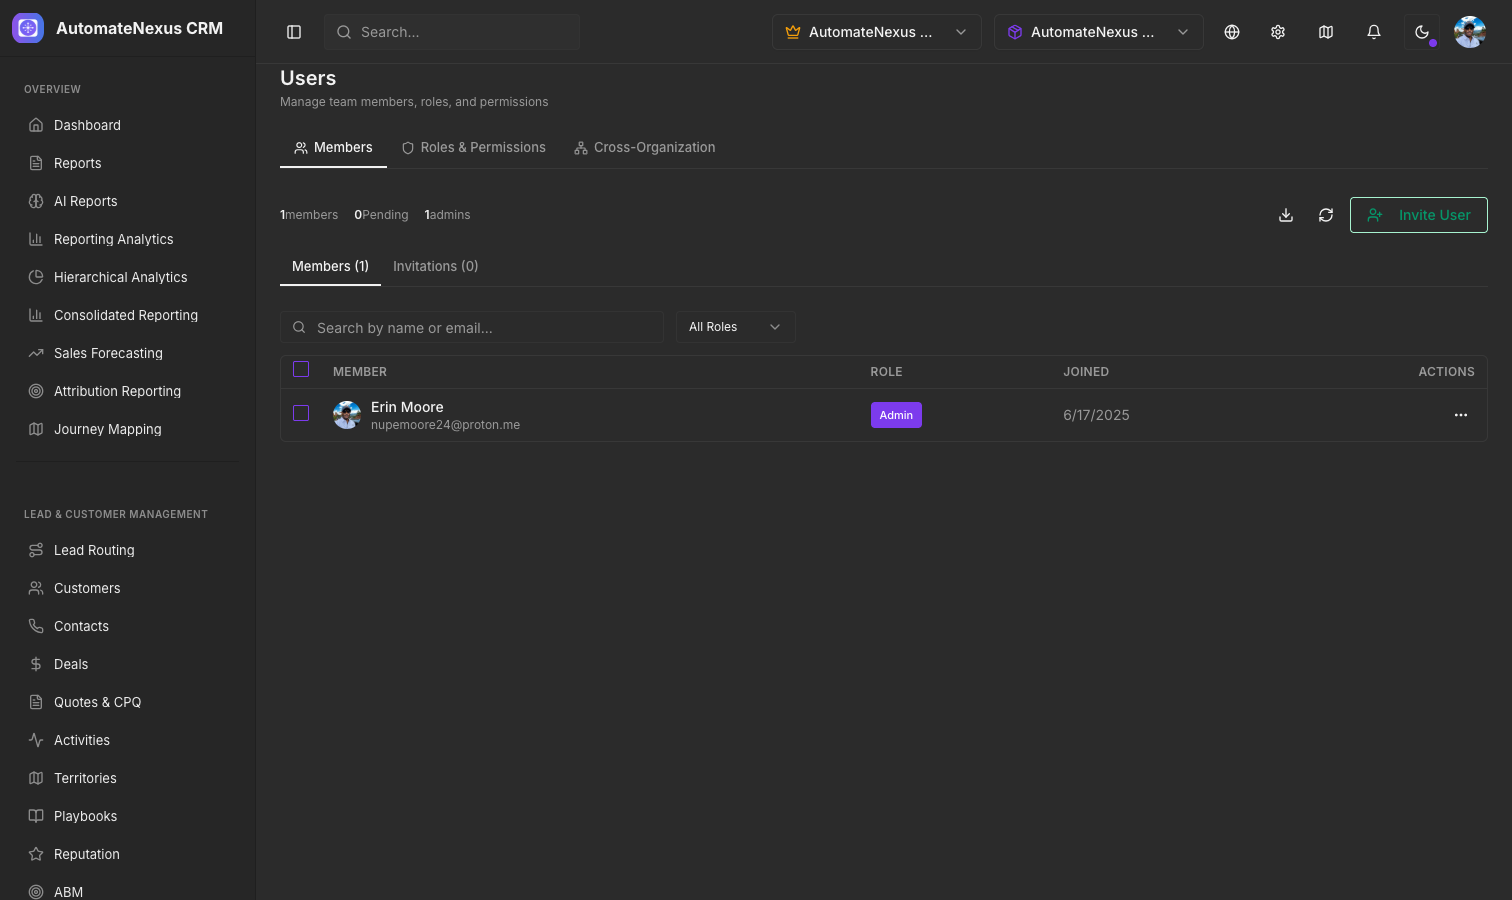
Role-based access is a security model where permissions are assigned to roles rather than individual users. Each member of an organization has one role, set per member under Administration → Access → Members, and that role determines their level of access across the platform. This approach simplifies permission management because administrators only need to manage a small number of roles rather than configuring permissions for each individual user.
AutomateNexus CRM has four member roles:
- Owner - The person who created the workspace. An Owner has everything an Admin has.
- Admin - Full access within the organization. Admins invite and remove members, change roles, create and manage workspaces and workspace membership, and open the administrative screens: the organization sections of Settings (Modules, Custom fields, Security, Approvals, Notetaker seats, API keys, Audit log, White-label), Custom Objects, Employees and Plans.
- Manager - A team member with a manager badge. Managing members, workspaces and organization settings still requires Admin or Owner.
- User - Access to day-to-day operational features including people, deals, projects, tasks, communications and documents, plus their own account settings (profile, appearance, language, preferences, notifications and authentication). Users cannot modify organization settings or manage other members.
Separately, Administration → Access → Employee roles holds custom roles with their own permission sets. These roles apply to the employee portal only; access to the CRM itself is set by the member role above.
What Requires Admin or Owner#
The following table lists the capabilities that are reserved for Admins and Owners. Everything else - the Dashboard, People, Companies, Deals, Activities, Quotes, Projects, Tasks, Mail, Chat, Calendar, Documents, Reports and your own account settings - is available to every member, within the workspaces they belong to.
| Capability | Where | Admin / Owner | Manager / User |
|---|---|---|---|
| Invite members, change roles, remove members | Administration → Access → Members / Invitations | Yes | No |
| Create, edit, delete workspaces and manage workspace members | Workspace switcher → Create New Workspace; Workspaces page | Yes | No |
| Switch on or off product modules | Settings → Modules | Yes | No |
| Manage custom fields | Settings → Custom fields | Yes | No |
| Create custom objects | Administration → Custom Objects | Yes | No |
| Manage employee records | Team → Employees | Yes | No |
| Organization security settings and audit log | Settings → Security, Settings → Audit log | Yes | No |
| Review approval requests | Settings → Approvals | Yes | No |
| API keys and notetaker seats | Settings → API keys, Settings → Notetaker seats | Yes | No |
| White-label branding | Settings → White-label | Yes | No |
| Karrie daily brief, lead scoring and channel alert settings | Settings → Notifications | Yes | No |
| Invite a person to the client portal | People record menu | Yes | No |
| Plans, billing and AppSumo code redemption | Administration → Plans | Yes | No |
Role-Based Access Business Scenarios#
To illustrate how roles work in practice here are three common business scenarios:
Scenario 1: Sales Team Setup#
A company has a sales director and five sales representatives. The sales director needs to manage the team, configure pipeline stages, and generate reports. The sales reps need to create and manage their own deals, log activities and communicate with customers, but should not be able to change organization settings.
Configuration: Assign the sales director as an Admin. This gives them full access to invite new team members, manage workspaces and organization settings, and generate reports. Assign each sales representative as a User. They can create people and deals, log activities, use mail, chat and the calendar, but cannot change organization settings or manage other members.
Scenario 2: Multi-Department Enterprise#
A mid-size company has separate sales, marketing and support departments. Each department needs its own data space, but the VP of Operations needs to see everything.
Configuration: Create three workspaces (Sales, Marketing, Support) from the workspace switcher. Make the VP an Admin and add them to all three workspaces. Add department heads and team members to their own department's workspace with Workspace Members on the Workspaces page. Workspace isolation ensures each department only sees their own data, while anyone who belongs to several workspaces can switch between them from the header.
Scenario 3: Agency Managing Client Organizations#
A digital agency manages CRM operations for multiple client companies. The agency needs centralized oversight, while each client organization should be independent and unable to see other clients' data.
Configuration: On a plan that includes client organizations, the agency's Admins see an Organizations group under Administration → Access. Invite each client from Access → Invitations with the Organization invitation type so they create their own organization under yours, then give the client's own staff Admin or User roles inside it. The Your organizations overview shows each organization's plan, seats, who administers it and how active it is, Users in your organizations lists everyone across them, and you can invite people straight into any client organization.
Step-by-Step User Invitation Flow#
Inviting new users to your organization follows a specific workflow. Only Admins and Owners can invite users.
- Navigate to Administration → Access in the sidebar and open Invitations.
- Click Send Invitation.
- Keep the Invitation Type on Team Member.
- Enter the new user's Email address, and optionally their first and last name.
- Select the Role to assign: User, Manager or Admin.
- Optionally add a personal note, then send the invitation.
- The system generates a unique invitation link and emails it to the recipient.
- The invited user clicks the link in the email, which takes them to the invitation page.
- If the user already has an AutomateNexus CRM account they sign in there. If not, they create a new account during acceptance.
- Once accepted the user appears in your Members list with their assigned role.
You can also send a quick invitation from Access → Members with Invite User (email address and role only). Invitation tracking is built in: the Invitations page lists invitations under All, Pending, Accepted and Revoked, shows when each pending invitation expires (7 days after it is sent, with an Expires soon warning in the last 24 hours), and lets you Resend or Revoke a pending invitation.
Changing a Member's Role#
Open Administration → Access → Members. The table lists every member with their name, email, role and join date, and can be searched, filtered and sorted. Change a role directly in the Role column (User, Manager or Admin), or open the member to edit their details. Only Admins and Owners can change roles.
Client Organizations#
Plans that include client organizations let one organization manage others. When your account has this ability, Administration → Access gains:
- Users in your organizations - A directory of every user across the organizations you manage.
- Your organizations - An overview of each managed organization: plan, seats used, who administers it and how active it is, with a shortcut to invite people into it.
- Plans - The plan of each managed organization.
- Organizations - The full list, where each organization has Details, Members, Workspaces and Hierarchy tabs.
Client organizations operate independently with their own members, workspaces, customers, deals and data. Their users cannot see data from your organization or from sibling organizations. Seats count members other than client-portal users against each organization's plan.
Approval Workflow Configuration#
AutomateNexus CRM includes an approval workflow system that requires an admin to sign off on certain records before they are finalized. Approval workflows are switched on per record type for your organization by the AutomateNexus CRM team: contact support to have invoices, deals, orders, projects or other records wait for an admin.
Once a type is on, pending requests appear under Settings → Approvals (Admins), with a count next to the section name. The Pending tab shows each request with what is waiting, and approvers can approve or reject it, adding a note when rejecting. The History tab keeps past decisions. Drafts written by the AI assistant are a separate queue under AI → Agent Approvals.
Workspace Membership#
Workspaces segment your organization's data. Admins manage who belongs to which workspace:
- Open the Workspaces page at /admin/workspaces.
- Open Workspace Members on the workspace card.
- Pick a person from your organization to add them; the list only offers people who are not yet members.
Members switch between the workspaces they belong to from the workspace switcher in the header.
Removing Users#
When a team member leaves the organization or needs to have their access revoked, Admins and Owners can remove them:
- Navigate to Administration → Access → Members.
- Find the user in the Members list and click the row to open their details.
- Click Remove, or select several rows and use the table's delete action to remove them together.
- The person is removed from the organization and can no longer open its workspaces.
Important: Removing a user from an organization does not delete their platform account. They can be invited again later.
Audit Log#
Changes in your organization are recorded in the audit log under Settings → Audit log (Admins). Each event shows who did it, the action (Create, Update or Delete), the record type and a risk level. Filter the log by user, action, risk level, record type and date range for compliance and security reviews.
Troubleshooting Access Issues#
If users report problems accessing features or data here are the most common causes and solutions:
| Issue | Likely Cause | Solution |
|---|---|---|
| User cannot see certain sidebar items | The module is switched off, or the item is admin-only (Employees, Custom Objects) | Switch the module on under Settings → Modules, or check the role badge in Settings → Profile and promote the user to Admin if they need administrative access. |
| User sees no data on Dashboard | Not a member of the workspace, or the wrong workspace is selected | Add the user with Workspace Members on the Workspaces page, and check the workspace switcher in the header. |
| User cannot invite team members | User or Manager role | Only Admins and Owners can invite users. Promote the user if appropriate. |
| User cannot access billing | User or Manager role | Plans and billing require the Admin or Owner role. |
| Organizations group not visible in Access | Plan does not include client organizations | Client organizations are available on plans that include them. |
| Approval requests stuck in pending | Approver has not reviewed | Check Settings → Approvals → Pending. Notify an Admin. |
| User cannot access organization settings | User or Manager role | The organization sections of Settings are restricted to Admins and Owners. |
Best Practices for Permission Management#
- Follow the principle of least privilege - Assign the minimum role needed for each user to perform their job. Start with User and promote only when necessary.
- Use workspaces for data isolation - Instead of creating complex permission rules use workspaces to naturally segment data access by team or department.
- Review member roles quarterly - Periodically audit roles in Access → Members to ensure they still match job responsibilities. Remove or demote access for users who have changed roles.
- Use approval workflows for sensitive records - Have record types that need sign-off, such as invoices or deals, wait for an admin to add a layer of oversight.
- Document your access policy - Maintain an internal document that defines which roles are appropriate for which job titles in your organization.
- Monitor the audit log - Regularly review Settings → Audit log to detect unauthorized or accidental changes.
Related Articles#
- Welcome to AutomateNexus CRM - Platform overview including the complete sidebar navigation reference for all features.
- Setting Up Your Account - Step-by-step onboarding including team invitation and profile configuration.
- Dashboard Overview - Understand the dashboard cards and how workspaces scope what you see.