Setting Up Your Account#
Getting started with AutomateNexus CRM involves a streamlined onboarding process that takes you from account creation through workspace setup, team invitations, and personal profile customization. This guide walks you through every step in detail so you can configure your environment correctly from the start and avoid common setup pitfalls.
Step 1: Account Creation and Authentication#
To begin using AutomateNexus CRM, you need to create an account. Navigate to the login page and choose one of the following authentication methods:
- Email and password — Enter your first and last name, your email address and a password. You will receive a verification email that you must confirm before accessing the platform.
- Google, Microsoft or LinkedIn — Click one of the sign-in buttons at the top of the form to authenticate with that account. This verifies your email address automatically and streamlines the login process.
After successful authentication, you will be redirected to the application. If this is your first time logging in, the system will detect that you do not yet belong to an organization and will guide you through the setup wizard.
Password Requirements#
If you choose email and password authentication, your password must be at least 8 characters long. The form shows how many characters are still needed while you type.
Email Verification#
After registering with email and password, check your inbox for a verification email from AutomateNexus CRM. Click the verification link to activate your account. If you do not receive the email within a few minutes, check your spam folder or click Resend verification email on the verification page (you can resend once a minute).
Step 2: The Setup Wizard#
The workspace setup wizard is a guided multi-step flow that appears when you first log in without an existing organization. It lives at the /welcome route, shows your progress as n of N, and lets you go Back or Skip setup at any point. Your progress is saved, so you can leave and resume later. Here is what each step involves:
Step 2a: Accept an Invitation or Create a New Workspace#
If you received an invitation link from an existing organization, open it: the invitation page lets you create your account or sign in with an existing one, and joins you to that organization. If a plan or invitation is already waiting for your email address, the first wizard step says so and offers Open my invitation instead of starting a new workspace. If you did not receive an invitation, you proceed to create a new workspace from scratch.
Step 2b: You and Your Business#
The first step, Tell us about you and your business, creates your workspace. Fill it out as completely as possible; everything can be changed later.
| Field | Description | Required |
|---|---|---|
| First name / Last name | Your own name as shown to your team | Yes |
| Company name | The display name of your company or team (e.g., Acme Consulting) | Yes |
| Workspace handle | A URL-friendly identifier used in links (auto-generated from the company name) | Yes |
| Industry | Your industry, used to shape the starter items suggested later | No |
| Team size | How many people will use the workspace | No |
The following steps then tailor the workspace:
- Do you have a website? — Karrie reads your site and drafts your services, lead form, pipeline and booking page. You approve everything before it is created.
- Tell us about your business — Your services, use case, team type, how your customers buy, and your currency.
- Modules — Pick the parts of the platform you use; the sidebar shows only these. You can switch anything on later under Settings → Modules.
- Your starter items — Deal stages, services and other records built from your answers. Untick anything you do not want.
- Import your data — Upload CSV opens the Data Migration tool for your existing contacts and customers. You can also do this later.
- Connect your tools — Each integration opens in a new tab; skip anything you would rather do later, and the dashboard checklist keeps track.
- Brief Karrie — A short description of your business that the AI assistant uses for its drafts.
- Invite your team — Email addresses with a role of Admin, Manager or Team member. Each person gets an email with a link.
- Review — Here is what your workspace has now, with the option to add sample records you can remove later from the dashboard checklist.
Step 2c: Plan Selection#
The last step, Choose your plan, shows the available plans. It is skipped when the workspace already has a plan. You review any purchase on a secure checkout page first, and you can always choose or change a plan later from Administration → Plans.
Step 2d: Setup Completion#
Once you finish or skip the wizard, your workspace is created, your profile is linked to it, and you land on the Dashboard. A Set up your workspace checklist at the top of the Dashboard tracks the remaining steps (first contact, pipeline review, first deal, payments, invoices, projects, booking page, email, team, company profile) until you complete them or mark setup complete.
Step 3: Organization Settings#
After initial setup, the organization-wide settings live under Administration → Settings, in the Organization group of the left menu:
Organization#
Settings → Organization holds the client support settings: the support email, support phone and support hours shown to your clients, and a switch to show the live chat button on client portals.
White-label#
Settings → White-label (Admins) holds the application name, your custom logo, your brand colors and the option to hide platform branding. See Step 7.
Client Organizations#
If your plan includes client organizations, Administration → Access also shows an Organizations group: an overview of the organizations you manage (plan, seats, who administers each one and how active they are), their plans, and an Organizations list whose Details tab holds each organization's name, slug, email, phone, website, description, address, city, state, zip code, country and active status, alongside Members, Workspaces and Hierarchy tabs.
Step 4: Workspace Configuration#
Workspaces are isolated data environments within your organization. They allow different teams to maintain separate sets of customers, deals, projects, and other records while sharing the same organizational infrastructure. You switch and create workspaces from the workspace switcher in the header.
When to Use Workspaces#
Workspaces are ideal in the following scenarios:
- Multiple departments — Your sales team, marketing team, and support team each need their own customer lists and deal pipelines.
- Regional offices — Different geographic regions need separate data but unified reporting at the organization level.
- Client segmentation — You want to separate enterprise clients from SMB clients with different workflows for each.
- Testing and development — Create a sandbox workspace for testing configurations before applying them to production.
Creating a Workspace#
Workspace creation is reserved for Admins and Owners. To create a new workspace:
- Open the workspace switcher in the header (it shows the name of your current workspace).
- Click Create New Workspace.
- Enter a Workspace Name (e.g., Sales Team, EMEA Region, Enterprise Accounts) and a Slug.
- Optionally add a Description, and choose whether the workspace is Active and whether to Set as Default Workspace.
- Save to create the workspace.
After creation, the workspace appears in the switcher under Switch Workspace. Admins can edit, delete or set a default workspace, and add people from the organization to a workspace with Workspace Members, on the Workspaces page at /admin/workspaces. Data within each workspace is isolated from other workspaces.
Switching Between Workspaces#
The workspace switcher is accessible from the header of the application. When you switch workspaces, all data views (customers, deals, projects, dashboard metrics) automatically filter to show only the data belonging to the selected workspace.
Step 5: Inviting Team Members#
To invite colleagues to your organization, navigate to Administration → Access. Its left menu has a People group with Members, Invitations and Employee roles (accounts that manage client organizations also see Users in your organizations and an Organizations group).
Invitation Process Step-by-Step#
- Open Administration → Access → Invitations.
- Click Send Invitation.
- Leave the Invitation Type on Team Member (the other types invite a client to their portal or onboard an employee).
- Enter the person's Email address, and optionally their First name and Last name.
- Select a Role: User, Manager or Admin (see role descriptions below).
- Optionally add a personal note to the invitation email, then send it.
You can also invite from Access → Members with Invite User, which asks only for the email address and role. The invited user receives an email with a link; when they click it, the invitation page lets them create an account or sign in with an existing one and join your organization. Invitations expire after 7 days. The Invitations page lists them under All, Pending, Accepted and Revoked, shows when each one expires, and offers Resend and Revoke for pending ones.
Role Descriptions#
| Role | Description |
|---|---|
| Owner | The person who created the workspace. Has everything an Admin has. |
| Admin | Full access within the organization: invites and removes members, changes roles, creates and manages workspaces, and opens the organization sections of Settings (Modules, Custom fields, Security, Approvals, Notetaker seats, API keys, Audit log, White-label), Custom Objects, Employees and Plans. |
| Manager | A team member with a manager badge. Managing members, workspaces and organization settings still requires Admin or Owner. |
| User | Access to day-to-day operational features such as people, deals, projects, tasks, and communication tools, plus their own account settings. |
Step 6: Profile Configuration#
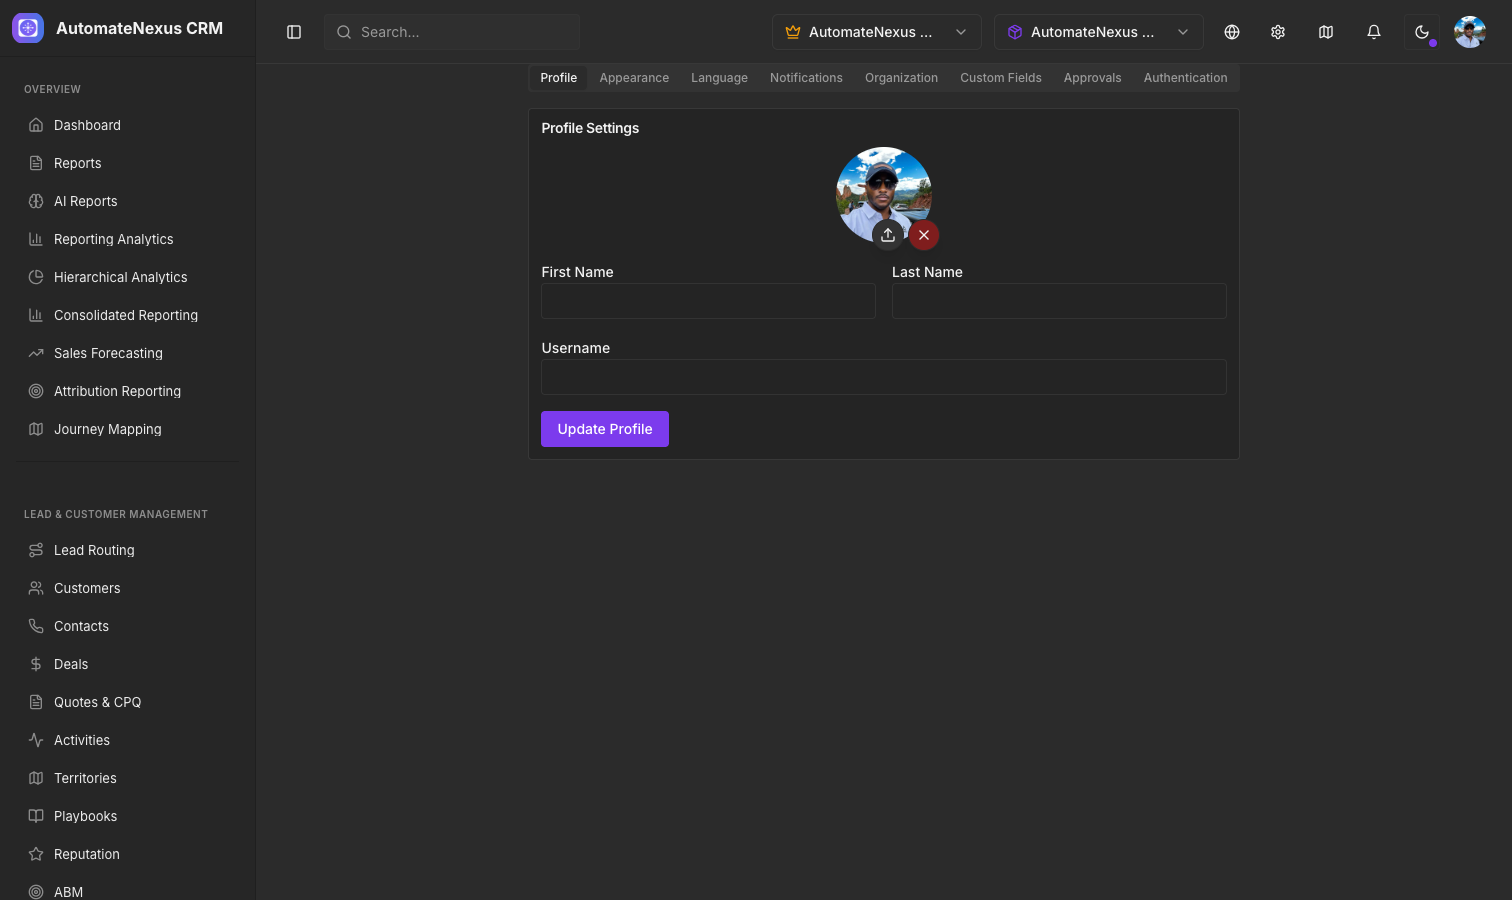
Your personal profile determines how you appear to other team members and controls your individual preferences. Navigate to Administration → Settings (or the settings icon in the header) to access your profile and preferences. The Settings page is organized into sections in a left menu: an Account group (Profile, Appearance, Language, Preferences, Notifications, Authentication) and an Organization group (Organization, Invoicing, and for Admins also Modules, Custom fields, Security, Approvals, Notetaker seats, API keys, Audit log and White-label).
Profile#
The Profile section displays and allows editing of your personal information:
- First Name — Your given name as displayed throughout the platform.
- Last Name — Your family name or surname.
- Username — A unique username for your account.
- Profile photo — Upload a profile photo. The image is displayed as your avatar in activity feeds, comments, and team views.
- Email — Your email address (read-only here; change it from the Authentication section).
- Role — Your role badge (for example Org admin or Member), set by administrators, together with the date you joined.
- Email account — The personal email account you have connected for sending and syncing mail.
Click Update Profile to save your changes.
Appearance#
Customize the visual appearance of the application:
- Colour theme — Choose one of the branded color palettes.
- Display mode — Switch between Light, Dark, or System (follows your operating system preference). The theme toggle in the header switches the mode too.
Language#
AutomateNexus CRM supports multiple languages. The Language section lets you:
- Select your preferred interface language: English, Spanish, French, German, Italian, Portuguese, Chinese (Simplified), Japanese, Korean or Arabic.
- The application interface including sidebar labels, form fields, buttons, and system messages will be translated to your selected language.
- Language preferences are stored per user and persist across sessions. The language switcher in the header changes it too.
Preferences#
Regional preferences for how the application shows values to you: Timezone, Time Format (12-hour or 24-hour), Date Format, Number Format and Default Currency.
Notifications#
Configure how and when you receive notifications:
- Preferences — Toggle each notification category on or off: Mentions, Assignments, Approvals, Deals, Tasks, Meetings, Invoices & Payments, Support Tickets, Documents and System. A test panel lets you send yourself a test notification.
- Push — Enable push notifications in your browser.
- Analytics and Segments — Review notification delivery and manage notification segments.
Admins also see Daily brief and lead scoring (when Karrie's brief is ready, when a deal counts as stalled, when a lead counts as hot) and Karrie channel alerts in this section.
Organization#
View and manage the client support settings: the support email address, support phone and support hours shown to your clients, and whether the chat button appears on client portals.
Custom Fields#
Available to Admins, this section lets you create and manage custom fields that extend the data model for contacts, deals, customers, companies and projects. Custom fields appear on the matching record pages and as table columns, and can be used in filters.
Approvals#
The Approvals section (Admins) shows all pending approval requests within your organization, with a history of past decisions. Approval workflows are switched on per record type by the AutomateNexus CRM team: once a type is on, new invoices, deals, orders, projects or other records of that kind wait for an admin before they are finalized.
Authentication#
Manage your sign-in: your current session (email, sign-in method, last sign-in), change your password or email address, set up two-factor authentication, review and end other sessions, manage connected accounts (Google, Microsoft, LinkedIn), export your data or delete your account. You can also sign out of your account from this section.
Step 7: White-Label Logo Upload#
AutomateNexus CRM supports white-label branding, allowing you to replace the default logo with your own company logo. This is configured at the organization level by an Admin. To upload your logo:
- Navigate to Administration → Settings → White-label.
- Enter your Application Name.
- Under Custom Logo, upload your company logo.
- Supported formats are PNG, JPG, GIF and WebP, up to 5 MB.
- Optionally set your brand colors and switch on Hide Platform Branding to remove the "Powered by" notices.
The logo appears on your sign-in page in place of the default logo.
Step 8: Billing and Plan Selection#
Manage your subscription and billing from Administration → Plans (also reachable as Plans & billing from your account menu at the bottom of the sidebar). Payments are processed by Stripe. Key billing features include:
- Current plan — See the plan your organization is on and the upgrade options; any change is confirmed on a secure checkout page first.
- Billing — Manage your payment method, view your invoices and open the Stripe billing portal.
- AppSumo redemption — If you have an AppSumo code, redeem it from the card on the Current plan tab (or the link in your AppSumo email) to activate your lifetime deal.
Troubleshooting First-Time Setup Issues#
If you encounter problems during your initial setup, here are solutions to the most common issues:
| Issue | Cause | Solution |
|---|---|---|
| Verification email not received | Email may be in spam or blocked by your email provider | Check spam folder. Click Resend verification email on the verification page (once a minute). Whitelist the AutomateNexus CRM sending domain. |
| Invitation link expired | Invitations expire after 7 days for security | Ask an administrator to click Resend on the invitation under Administration → Access → Invitations. The list shows each invitation's status and expiry. |
| Cannot see organization after login | Profile not yet linked to an organization | Complete the setup wizard. If it does not appear, navigate to /welcome directly. |
| Workspace not visible | You have not been added to the workspace | Ask an Admin to add you with Workspace Members on the Workspaces page (/admin/workspaces). |
| Cannot invite team members | Insufficient permissions | Only Admins and Owners can invite users. Check your role badge in Settings → Profile. |
| Logo not displaying after upload | Image format or size issue | Ensure the logo is PNG, JPG, GIF or WebP and under 5 MB. |
| Cannot access billing | Not an organization admin | Billing management requires the Admin or Owner role. Contact your administrator. |
Next Steps#
Once your account is fully configured, proceed to the following areas to start using AutomateNexus CRM productively:
- Dashboard Overview — Learn how to read your main dashboard cards and KPIs.
- Managing Contacts — Import and organize your customer database.
- Visual Deal Pipeline — Set up your sales pipeline stages and start tracking deals.
- User Roles & Permissions — Configure access for your team members.