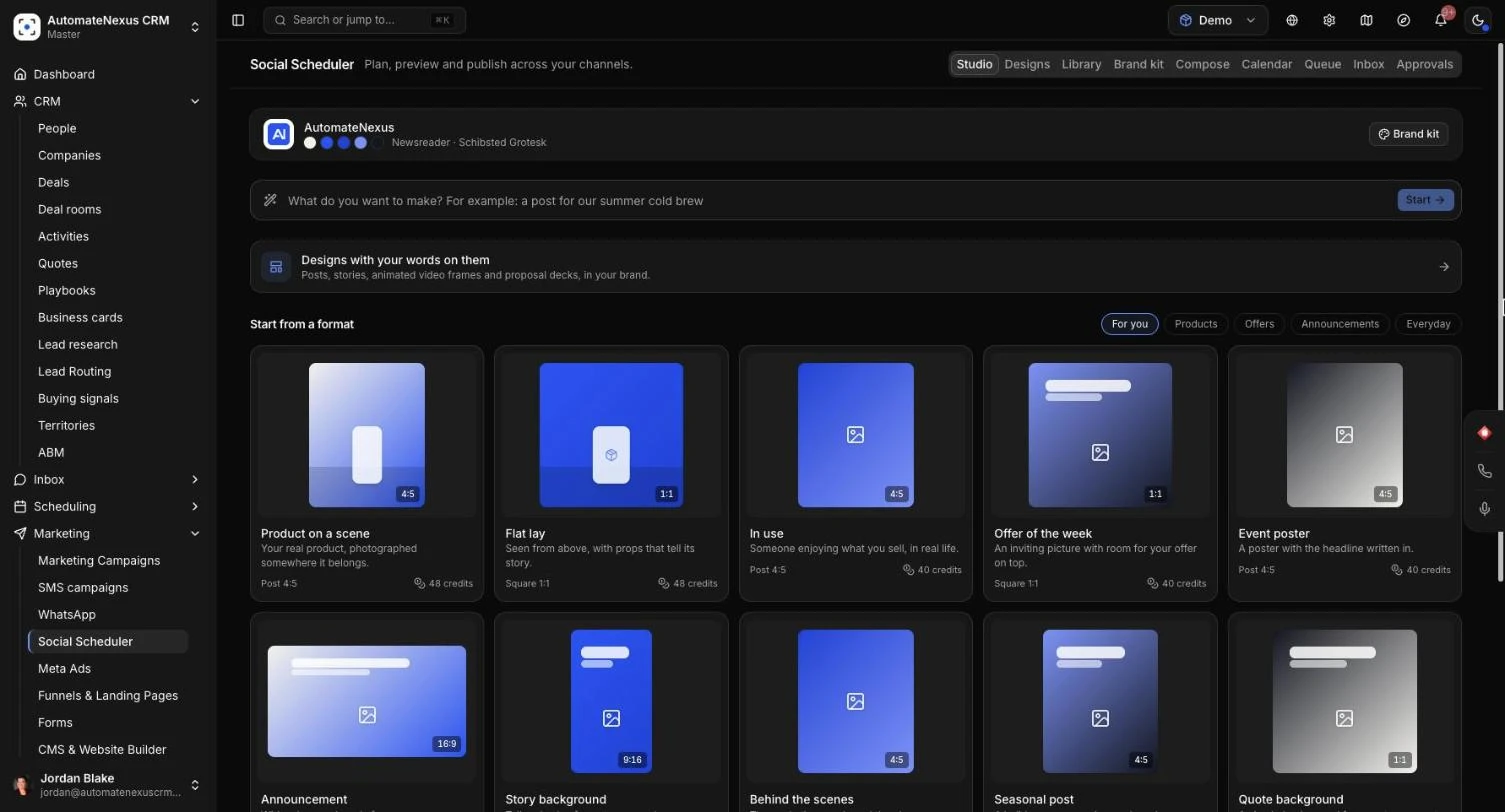
The Content Studio in AutomateNexus CRM makes the pictures, designs, short animated videos and proposal decks your marketing needs, in your own brand. Say in a sentence what you want, or start from a ready-made format, and the Studio makes it in your colours, fonts and logo. Everything is kept in one library, ready to drop into a social post. This guide covers the brand kit, pictures, designs, video frames, proposal decks, the library and how Studio credits work. Allow about 10 minutes to set up your brand kit and make your first post.
Before You Start#
- The Studio lives in the Social Scheduler. Go to Marketing → Social Scheduler; it opens on the Studio tab. Beside it are Designs, Library and Brand kit.
- Pictures, designs and videos use Studio credits, or your own OpenRouter key. See "Studio Credits" below.
- Have your website address ready. The Studio reads your brand from it.
Step 1: Set Up Your Brand Kit#
- Open the Brand kit tab.
- Under Read it from a website, type your website address and click Read.
- In a few seconds the Studio fills in your Logo, Colours, Heading font and Body font from the site itself, and writes How the business sounds and Who it is for from its words.
- Check it over and change anything. You can also fill in The look of its pictures, Words it uses and Words it avoids.
- Click Save. Nothing is kept until you save.
Everything the Studio makes follows your brand kit. An agency can keep one kit per client and pick it in the Studio; use Make it the default on the kit you use most.
Step 2: Make a Picture#
On the Studio tab, either type what you want in What do you want to make? (for example, "a post for our summer cold brew"), or pick a format under Start from a format. There are ten: Product on a scene, Flat lay, In use, Offer of the week, Event poster, Announcement, Story background, Behind the scenes, Seasonal post and Quote background. If your products have photos, they appear under Start from a product.
- Choose what to make: an Image from your words, a Product photo (your real product, in a new scene) or Change a photo.
- Fill in the boxes. For a product photo, pick the product or upload a photo of it. The product stays exactly as it is in its photo; only the scene around it is made.
- Choose the shape: Post (Instagram and Facebook feed), Square, Story (stories, Reels, TikTok) or Wide (LinkedIn, X, YouTube).
- Choose the Quality (Draft for ideas, Standard ready to post, or Premium for the finest detail) and How many, up to four.
- Optionally switch on Room for a headline (a calm area for text you add later) or Show safe zones (where a network's buttons and caption cover a tall picture).
- Check the cost on the button, then click Make. Pictures take about half a minute, and you can keep working meanwhile.
When your pictures appear, use Change with words to alter one, More like this for variations, Resize for… to fit another network, Download, or Use in a post to open it in the composer. Pictures are marked as AI-made, and labelled as such where a network asks.
Step 3: Make a Design#
Designs are finished pieces with your words on them, laid out in your brand kit's colours, fonts and logo. Open the Designs tab and pick one:
- Posts: Announcement, Carousel (three to five slides), Tips list, Customer review, Big number and Offer.
- Stories: Story poster and Event.
- Video: Logo ending, Title card, Number reveal and Review reveal, marked Animated.
- Decks: Proposal deck and Introduction deck.
- Each template previews in your own brand. Pick one.
- Say in a few words what it is about. Write the real facts: the design uses your words and never makes up prices, reviews or numbers.
- Optionally add your own photos with Add from the library.
- Click the Make button, which shows the cost. It takes about a minute, and the design appears under Your designs when it is ready.
Open a finished design to Use in a post or Download its picture or pictures. Using a design in a post also saves it to your library.
Animated Video Frames, Saved as MP4#
The four video designs move in your brand: a logo that builds itself, a bold opening title, a number that counts into place, or a customer review that appears word by word. Use them for a reel, a story or the end of a video.
- Make the design as above, then open it.
- Click Make video. The video is made in your browser.
- Click Download video for the MP4 file, or Use the video in a post, which saves it to your library and puts it in the composer.
Proposal Decks from Your Quotes#
A proposal deck is a short presentation to send with a quote: what you found, what you will do, what is included and the price. Prices, totals and terms come from the quote, exactly as you wrote it there.
- Make the quote for the deal first.
- Open the deal, open its menu and choose Make a proposal deck. The Studio opens on the Proposal deck design with the deal's quote ready. You can also start one on the Designs tab and choose The quote it goes with.
- Add anything the deck should say that the quote does not, for example what you found on site, and make it.
- Open the deck and click Download PDF, or Make a link to send to copy a link for the customer. The deck then shows how many times it was opened.
Click Turn the link off to stop anyone opening it again, or Open the quote to go back to the quote. An Introduction deck tells a new customer who you are and how you work before a first meeting, and needs no quote.
The Library#
Everything made or uploaded in the Studio is kept on the Library tab with what made it. Filter by All, Pictures, Videos, Made in the Studio or Uploaded, and search by title.
- Drop pictures (PNG, JPEG, WebP, GIF) or videos (MP4, MOV, WebM) on the page, or upload them.
- Open an item to see its size, file, whether it is AI-made and the words that made it. Give it a title to find it by.
- Choose Use in a post, Change it, Download or Move to bin. Posts that already use an item keep it.
In the composer, Add from the Studio library brings any item into a post.
Studio Credits#
Pictures, product photos, designs and videos in the Studio use Studio credits. Every Make button shows its cost before anything is made, and credits are given back if a design fails.
- Buy credits: under Administration → Plans, on the Studio credits card beside AI credits, click Add Studio credits. Studio credits are $5 a month for 500, and you can add as many blocks as you need.
- See what is left: the Studio shows This run and Left this month beside the Make button.
- Agencies: client accounts share their agency's Studio credits, which an admin of the agency adds.
- Your own key instead: connect an OpenRouter key of your own under Administration → Integrations → AI providers. The Studio then uses it, billed by OpenRouter, and no credits are needed. The buttons show on your key.
Studio credits are separate from AI credits. AI credits (or your own AI key) run Karrie, the agents and the writing helpers, including the brand kit's voice.
Troubleshooting#
- "This needs … credits and … are left": click Add Studio credits, or connect your own OpenRouter key.
- "No brand kit yet: pictures use your words only": set up your brand kit on the Brand kit tab.
- "The website could not be read": check the address, or fill in the brand kit by hand.
- "This deal has no quote yet": click Make the quote first, then come back for the deck.
- "This design could not be made": open it to try again. The credits for a failed design are given back.