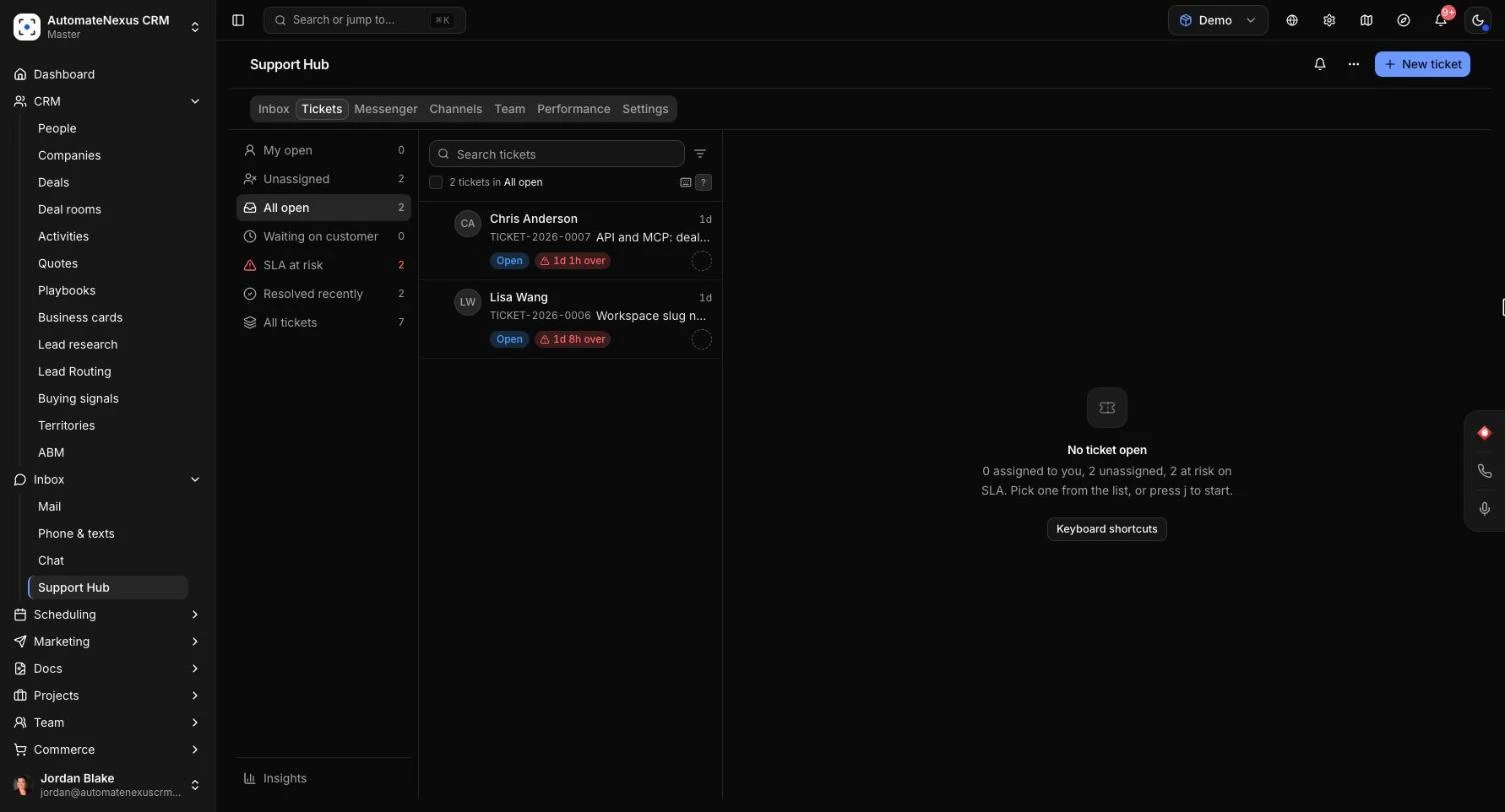
The Support Hub's ticket workspace is where your team works through every support request in one list: tickets your clients raise in their portal, ones your AI agents and website chats hand over, and ones you create yourself. You open a ticket beside the list, reply to the client or leave a note for the team, and keep your own working details on it that the client never sees. It is for anyone who answers support, and setting it up takes about 10 minutes.
Before You Start#
- Open the Support Hub from Inbox → Support Hub in the sidebar, then click the Tickets tab. The other tabs (Inbox, Messenger, Channels, Team, Performance and Settings) are covered in AI Agents & Support Center.
- Set your response targets first, so the list can warn you before a ticket runs late (see Step 1).
- For clients to raise tickets themselves, give them access to your client portal.
Where Tickets Come From#
Every ticket lands in the same list, numbered for your organization, whatever started it. The ticket shows its source: Client portal, Website chat, AI agent, Created in the CRM, Email, Phone, API or Form. Your team and the client reply on the same ticket.
- From the client portal: a client clicks New ticket, fills in the Subject, Priority, Category and What do you need?, and can add files such as a screenshot, a document or a photo. Your team opens the files from the ticket, and each one is kept with that client's documents.
- From your team: click New ticket at the top of the Support Hub. Choose who it is For (Contact or customer, or Someone else with a name and email for someone not in the CRM yet), then the Subject, Description, Status, Priority and Category.
- From a website chat: Create ticket on the chat opens a ticket linked to it.
Step 1: Set Your Response Targets#
- Open the Settings tab of the Support Hub.
- Under Business hours, set your hours and Time zone.
- Under SLA fallbacks and routing, set First response (minutes) and Resolution (hours). These are used when no per-priority policy matches.
- Under SLA policies, set First response and Resolution targets for each priority, and choose what each policy Applies to.
- Under Notifications, turn on SLA warnings so the team is told when a ticket's first reply or resolution is 15 minutes from due, and again when it is overdue.
- Click Save settings.
Step 2: Work Through the List#
On the left of the Tickets tab are saved views, each with a live count:
- My open: open tickets assigned to you.
- Unassigned: open tickets nobody has picked up.
- All open: everything not resolved or closed.
- Waiting on customer: tickets waiting for the client to reply.
- SLA at risk: open tickets past, or close to, their target.
- Resolved recently: resolved or closed in the last 7 days.
- All tickets: every ticket, whatever its status.
Below them, under Internal status and Tags, are views for your team's own labels, and Insights shows response times, volume and SLA from these tickets. Each row shows the ticket's status, its SLA time left or over, your internal status and tags, and who has it.
Use Search tickets to find a ticket by subject, number, client, internal status or tag. Filter and sort narrows by Status and Priority and sorts by Newest first, Oldest first, Recently updated, SLA due soonest or Priority.
Change Many Tickets at Once#
Tick several tickets (or press x on each). A bar appears to assign them (Assign to me, Unassign or a teammate), set their Status or Priority, close them together, or set an internal status and add or remove tags. Clear selection (or Esc) ends it.
Step 3: Open and Answer a Ticket#
- Click a ticket (or move to it and press Enter). It opens beside the list, so you never lose your place. Each ticket has its own address: Copy link in its menu gives you a link anyone on your team can open, and the back button works.
- Check the header: Status (Open, In progress, Waiting on customer, Resolved, Closed), Priority (Urgent, High, Medium, Low), the assignee and the category. Click Assign to me to take it.
- Read the Conversation. Beside it you see the Customer with Open record and their other open tickets, the SLA (On time or Responded late), and the Files, with those Sent by the client marked.
- In the reply box, choose Reply to client (the client sees it in their portal) or Internal note (only your team sees it).
- Write your reply. Quick replies inserts one of the replies saved under Settings → Quick replies, and Attach adds a file to the ticket.
- Click Send (or Add note). The arrow beside it also offers Send and set waiting on customer, Send and close and, on a closed ticket, Send and reopen.
The ticket's tabs also hold Details, Screen share and Activity, and its menu offers Start screen share, Schedule a meeting and Raise priority.
The Team Only Panel#
Every ticket has a Team only panel for what your team needs to keep on it. Your client never sees anything here, in the portal or anywhere else.
- Internal status: a status of your own, such as Waiting on dev or Needs quote, separate from the status the client sees.
- Internal tags: labels such as vip or billing. Type one and press Enter, or Add another tag.
- Your own fields: effort, billable, client priority and anything else. Add them under Settings → Custom fields, choosing Tickets (team only).
- Linked task: the web address of the task this is being worked in, in ClickUp, Asana, Jira or anywhere else. It must start with https://.
- Note for the team: what anyone picking this up should know.
Internal statuses and tags show on the ticket list, get their own views on the left, and can be searched and filtered.
Keyboard Shortcuts#
Press ? any time to see them all.
- j or ↓ and k or ↑: next and previous ticket. Enter: open it. Esc: close it, or clear the selection. /: search.
- r: reply to the client. n: add an internal note. a or i: assign to me. s: change the status. e: close the ticket. x: select it for bulk actions.
- Ctrl+Enter (⌘+Enter on a Mac): send. Add Shift to send and close. Esc leaves the reply box and keeps the draft.
What Your Client Sees#
In the client portal, a client sees only their own tickets: the subject, the status, and the conversation with your replies. Internal notes, the Team only panel, internal statuses, tags and your own fields stay on the team side. A client can reply on an open ticket; on a closed one they are asked to create a new ticket.
Notifications#
Under the Support Hub's Settings → Notifications, choose which bell notifications go to the people who answer support (the Team tab's chat agents, else your admins): New conversation, Escalations and SLA warnings. A conversation assigned to someone goes to them. Each person can still turn a kind off for themselves.
Reports and Connections#
- Performance tab: your organization's own figures for tickets Opened, Resolved and Open now, Satisfaction, first response and more.
- Webhooks: follow tickets in your project tool or Slack when one is filed, changed, moved to another status, retagged or answered. See Webhooks API.
- REST API: read, file and change tickets, their team-only details and files. See API Overview & Authentication.
Tips#
Troubleshooting#
- "This ticket can't be opened": it may have been deleted, or it belongs to another workspace. Click Back to tickets, or switch to the right workspace.
- "Tickets didn't load": check your connection and click Try again.
- No SLA time shows on a ticket: no target applies to it. Set targets under Settings → SLA policies, or the fallback under SLA fallbacks and routing.
- A client cannot add files: their portal login must be linked to a customer record, as files are kept with that customer's documents.
- "Your files could not be sent" for a client: the ticket was not created. They can try again, or send it without the files.
- A linked task won't save: use a web address starting with https://.
- Your own fields are missing from the Team only panel: add them under Settings → Custom fields, choosing Tickets (team only).
Related Articles#
- AI Agents & Support Center: the rest of the Support Hub, including the Messenger and AI agents.
- Custom Fields & Custom Objects: add your own ticket fields.
- Webhooks API: send ticket events to other tools.
- Phone & Texts: calls, texts and WhatsApp in one inbox.