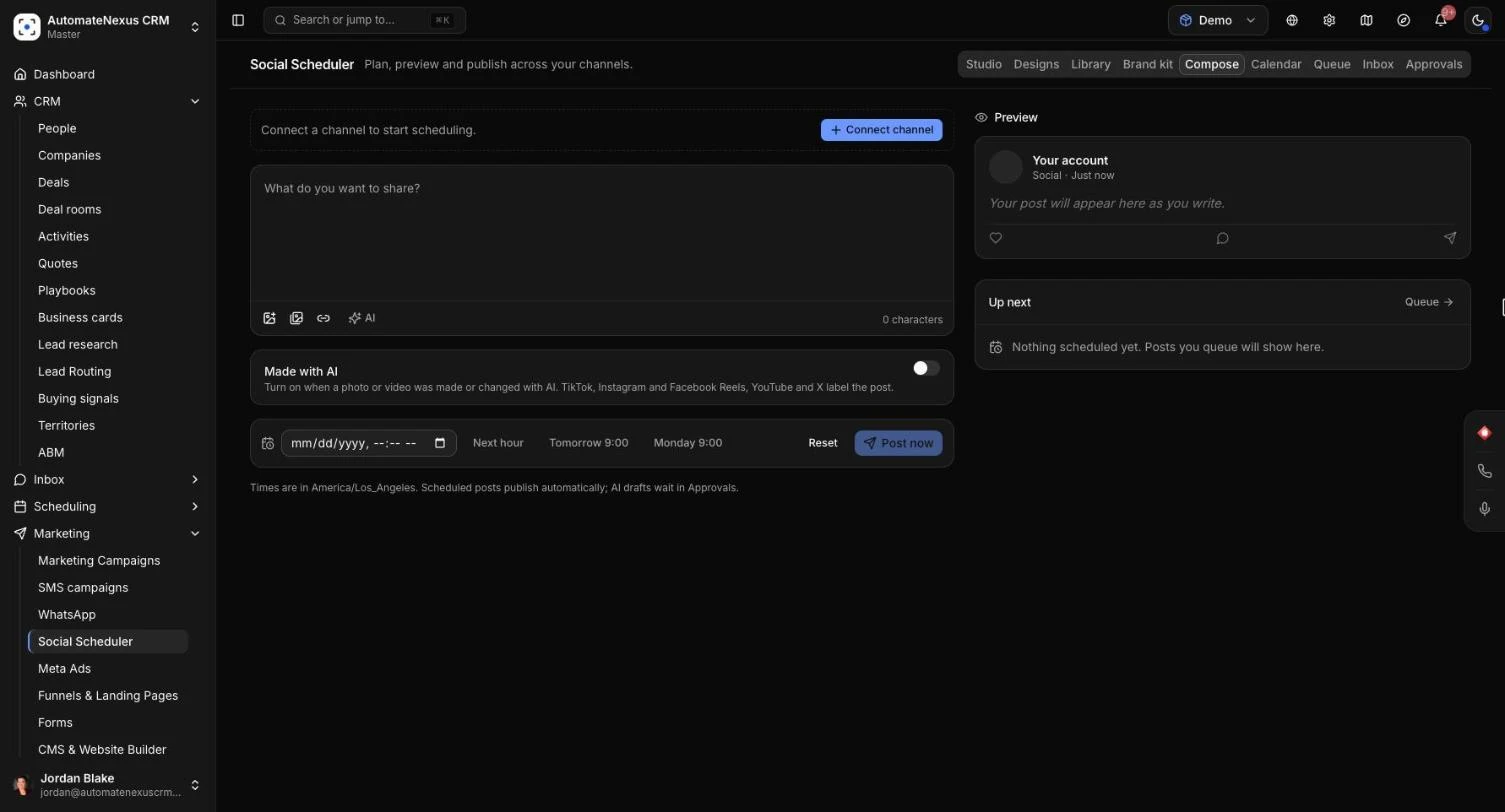
The Social Scheduler in AutomateNexus CRM lets you write a post once and publish it to Facebook, Instagram, LinkedIn, X, TikTok, YouTube and Google Business Profile, now or at the time you choose. You can see every post on a calendar, follow each one in the queue, reply to comments from one inbox, and have AI draft posts that wait for your approval. This guide covers connecting your accounts, writing and scheduling posts, and the calendar, queue, inbox and approvals. Allow about 10 minutes to connect your first accounts and schedule a post.
Before You Start#
- Go to Marketing → Social Scheduler. It opens on the Content Studio; the scheduling tabs are Compose, Calendar, Queue, Inbox and Approvals.
- Have the sign-in for each network ready. You sign in on the network itself, so AutomateNexus CRM never sees your password.
- Instagram needs a business or creator account linked to a Facebook Page.
- Writing posts with AI runs on your own AI provider key or on AI credits. Pictures and designs from the Studio use Studio credits; see Content Studio.
Step 1: Connect Your Accounts#
- Open the Compose tab and click Connect a channel (or Manage beside your channels). The Channels panel opens.
- Click Connect Account and choose a network: Facebook Pages, Instagram, LinkedIn profile, LinkedIn Page (where available), X (Twitter), TikTok, YouTube or Google Business Profile.
- Sign in on the network in the window that opens and allow access.
- If the network has more than one Page or location, tick the ones you want under Choose what to connect and click the connect button (for example Connect 1 account).
Each account's access is stored encrypted, used only to publish and read what you post, and removed when you disconnect. A network marked Not available yet is not offered in your workspace yet.
The Channels panel shows each account's state. Reconnect soon means its sign-in runs out shortly; Needs reconnecting or Disconnected means posts cannot go out until you connect it again. To remove an account, disconnect it from the same panel.
Step 2: Write a Post#
- On Compose, click the channels the post should go to. Each one you pick is highlighted.
- Write the post in What do you want to share?. The composer counts characters against the tightest limit of the channels you picked, for example 280 for X, 2,200 for Instagram and TikTok, 1,500 for Google Business and 3,000 for LinkedIn.
- Add pictures or a video with Add photos or a video: photos up to 20 MB, or a video (MP4, MOV or WebM) up to 500 MB. Or click Add from the Studio library.
- Optionally click Attach a link and paste the address.
- Turn on Made with AI when a photo or video was made or changed with AI. It turns on by itself when you attach something the Studio made. TikTok, Instagram and Facebook Reels, YouTube and X then label the post.
For TikTok and YouTube, extra settings appear below the post: a title, who can see it, and for TikTok what people may do with it and whether it promotes a brand. For YouTube, the post's words become the video's description.
Use Preview on the right to see the post as it will look on each account. Pick a channel above the preview to switch.
What Each Network Needs#
- Instagram and TikTok need a photo or a video.
- YouTube needs a video.
- If something does not fit a network, such as a photo that is too large or a video that is too long, the composer says what and for which network before anything is sent. Fix it, or deselect that channel.
Step 3: Schedule or Post Now#
- Pick a date and time in Schedule for, or use a quick pick: Next hour, Tomorrow 9:00 or Monday 9:00.
- Click Schedule for … (the button shows your time). With no time chosen, the button reads Post now and the post goes out straight away.
Times are in your own time zone, shown under the button. Scheduled posts publish automatically. Up next, beside the composer, shows your next few posts.
Write Posts with AI#
The AI assistant on the Compose tab writes posts for you.
- Under Describe your content idea, write what the post is about, such as a launch, an offer or a tip.
- Choose the Target Platforms.
- Click Generate Ideas, then click an idea to put it into the composer, where you can edit it.
Or let it plan for you:
- AI Draft → Approval writes a post and sends it to the Approvals tab for sign-off.
- Schedule All schedules every idea on the selected channels, one a day from tomorrow at 10:00.
- Create Campaign plans a dated draft for each of the Days you choose and sends them all to Approvals.
Approvals#
Posts drafted by AI wait on the Approvals tab before they are scheduled. The tab shows how many are waiting. Read each draft, then click Approve & schedule or reject it. Once approved, it goes out at its time. Team members who cannot approve see Waiting for an admin to approve.
The Calendar#
The Calendar tab shows your posts by day, with counts of Scheduled, Published and Failed. Click a date to see that day's posts. A scheduled post can be sent at once with Publish Now.
The Queue#
The Queue tab lists every post in three groups: Needs attention, Upcoming and Published.
- For an upcoming post, use Publish now, Reschedule (pick a new time and click Save) or Cancel.
- For a failed post, read the reason shown, fix it (for example reconnect the account), then click Retry.
- A post marked Processing… is with the network, which is still preparing it. It finishes on its own.
- Each published post shows its numbers. They arrive within a few hours of posting.
The Inbox#
The Inbox tab gathers comments and mentions from your connected accounts so you can answer them in one place.
- Filter by Unread, All, Replied or Archived.
- Click Reply and write your answer, or click AI suggest for a draft, then click Send reply.
- Use Mark read or Archive to keep the inbox tidy.
At the top of the inbox, Keyword listening (X) saves searches on X, such as your business name, and runs them for you. It needs a connected X account.
Use Studio Pictures in a Post#
Anything you make in the Content Studio has Use in a post. Click it and the picture or video goes into the composer, with Made with AI turned on, ready for you to pick channels, write the words and schedule it. See Content Studio.
Tips#
Troubleshooting#
- "Pick at least one channel": click one or more channels above the post.
- "Write something first": the post needs some words.
- "… needs a photo or a video": Instagram and TikTok cannot post words alone. Add a picture or video, or deselect that channel.
- "… characters over the … limit": shorten the post, or deselect the network with the smaller limit.
- "Wait for the upload to finish": large videos take a moment to upload.
- "Connect an X account under Accounts first": keyword listening runs with your X account. Connect one in the Channels panel.
- A post failed: open the Queue, read the reason under Needs attention, fix it and click Retry.