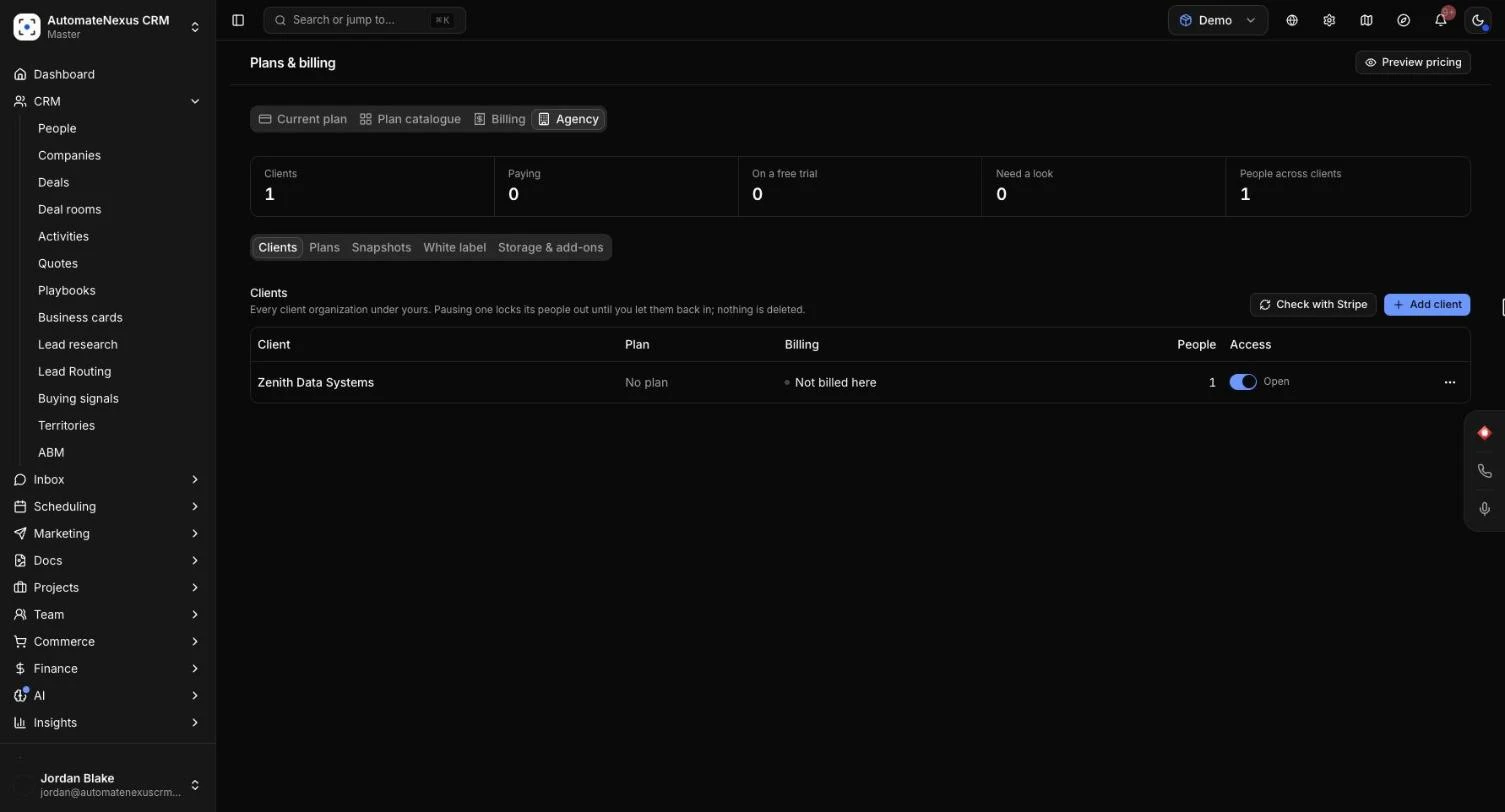
The Agency plan lets you run AutomateNexus CRM for your own clients. Each client gets an organization of its own under yours, with its own people, records and settings, and you decide what they pay, which parts of the CRM they get and whose brand they see. This guide covers client organizations, selling your own plans through your own Stripe account, snapshots that give every new client the same starting setup, white label and custom domains, and the storage you share with your clients. It is written for agency owners and admins. Allow about 30 minutes for the first setup.
Before You Start#
- The Agency plan. Client organizations and reselling come with the Agency plan ($597 a month), whether you pay monthly or bought a lifetime Agency tier. The Starter, Growth and Business plans cover your own organization, with as many workspaces inside it as you need, but not client organizations.
- Owner or Admin. Only Owners and Admins of the agency can add clients, sell plans, take snapshots and change the brand.
- Stripe, if you want to bill through the CRM. To sell plans to clients you connect your own Stripe account under Finance → Payment Processors. You can also add clients by hand and bill them however you like, with no Stripe at all.
The Agency Page#
Everything an agency runs lives on one page: go to Administration → Plans and open the Agency tab. It opens on your clients, with five figures across the top, all counted from your client list:
- Clients: every client organization under yours.
- Paying: clients with a live subscription.
- On a free trial: clients still in their trial.
- Need a look: clients whose payment failed, whose subscription ended or who are paused, plus anyone who paid and is not set up yet.
- People across clients: how many people your clients have between them.
Below the figures are five tabs: Clients, Plans, Snapshots, White label and Storage & add-ons. The page works on a phone too.
Step 1: Add a Client Organization#
A client appears on the Clients tab when somebody signs up through one of your plans (Step 3), or when you add one yourself:
- On the Clients tab, click Add client.
- Type the client's Name.
- If you have plans, choose a Plan, or leave it on No plan. A plan chosen here sets the client's limits, and you bill this client outside Stripe. If the plan starts new clients from a snapshot, the dialog names it.
- Click Add client. When the plan has a snapshot, the button reads Setting it up from the snapshot while the setup goes in.
Then open the client's workspace to set it up and invite its people.
You can also invite a client to create their own organization under yours: go to Administration → Access → Invitations, click Send Invitation and choose the Organization invitation type. The person you invite becomes an admin of the new organization.
Step 2: Open a Client's Workspace#
You can work inside any client organization as the agency:
- On the Clients tab, open a client's menu and choose Open its workspace. You land on that client's Dashboard.
- Or click your organization's name at the top of the sidebar, search the list and pick a client. Each organization in the list is labelled with its type.
To go back, click the organization name at the top of the sidebar again and choose Return to your own organization.
Your Clients Under Administration → Access#
Agencies also get an Organizations group under Administration → Access:
- Your organizations: each client's plan, seats, who administers it and how active it is, with Invite to invite someone straight into that organization. A client with no admin is flagged so you can Invite an admin.
- Plans: the plan of each organization you manage.
- Organizations: the full list, where you can open each organization's details.
- Users in your organizations (in the People group): everyone across your client organizations.
Seats count members other than client-portal users against each organization's plan.
Step 3: Sell Plans Through Your Own Stripe#
You can sell the CRM to your clients at your own prices. Clients pay straight into your Stripe account: AutomateNexus CRM takes nothing from a sale. When a client pays through a plan's link, their organization is created under yours, put on the plan, and its owner is emailed an invitation, with nothing for you to do.
Connect Stripe#
If Stripe is not connected yet, the Plans tab says so. Click Connect Stripe, which opens Finance → Payment Processors, and connect your Stripe account there. See Payment Processor Setup.
Create a Plan#
- On the Plans tab, click New plan.
- Under The plan, enter a Name, a short Description of who it is for, and What it includes: one line each, as your sign-up page lists them, up to 12.
- Under Price, pick the Currency (US, Canadian or Australian dollars, euros or pounds), the price Per month and, if you also sell it yearly, Per year. Leave the yearly price empty to sell it monthly only.
- Set Free trial, in days (0 for no trial). With a trial, the card is taken at sign-up and first charged when the trial ends.
- Under What the client gets, set People (how many people the client can have; empty for no limit) and Parts of the CRM: All of it or Only the parts I choose. Parts left out are not in the client's menu, and the client cannot switch them on.
- Switch on Its own brand if the client may put its own name, logo and colors on the app and its sign-in page. Off, the client runs under your brand.
- Under Where a new client starts, choose a Snapshot, or An empty workspace. See Step 4.
- Leave Open to new sign-ups on, and click Create plan.
Each plan row shows its price, what it includes, how many clients are on it, a Copy link button for its sign-up link, and a switch that opens or closes it to new sign-ups. The plan's menu has Edit, Open sign-up page and Delete. Deleting a plan stops its sign-up link working.
Share the Sign-up Link#
Send the link from Copy link to your client, or put it on your website. The client sees your plan, clicks Start free trial (or Get started when there is no trial), and pays on Stripe's checkout page. Their workspace is then set up and their way in is emailed to the address they gave at checkout. A closed plan's link says the plan is no longer offered; clients already on it stay on it.
Hearing From Stripe#
The CRM asks Stripe every hour where each subscription stands. To pause a client the moment its payment fails, the Plans tab shows an Endpoint and the Events to send to it: add that endpoint in your Stripe account, then save its signing secret under Payment Processors. On the Clients tab, Check with Stripe asks Stripe straight away.
Managing Your Clients' Billing#
The Clients tab shows each client's plan, whether it is billed monthly or yearly, where its billing stands and how many people it has. The billing column reads one of:
- Paying, with the renewal date.
- Free trial, with the first payment date.
- Payment failed: Stripe is retrying, and the client pauses on the date shown.
- Unpaid: the payment failed, and the client is closed until it pays.
- Cancelling: it ends with the period.
- Ended: its subscription ended in Stripe, and it is closed to its people.
- Paused: you paused it.
- Not billed here: a client you bill another way.
A client whose payment fails stays open for 14 days while Stripe retries, then closes. It opens again by itself when the payment lands. Your own people can still get in.
Pause or Reopen a Client#
Use the Access switch on a client's row. Pausing locks the client's people out at their next page; nothing is deleted, and you can let them back in at any time. Pausing does not cancel a Stripe subscription: it keeps charging until you cancel it in Stripe.
The Client Menu#
- Open its workspace: work inside the client's organization.
- Send the invitation again: when the owner has not joined yet (the row shows Invited, not joined yet).
- Keep without the subscription: for a client whose subscription ended. The client opens again on the same plan, and you bill it another way from then on.
- Put on a plan, billed outside Stripe: choose one of your plans for a client you bill yourself, or Take the plan off.
If someone paid and their organization is not set up yet, a Paid, and not set up yet notice appears above the list with Try again.
Step 4: Snapshots for Client Organizations#
A snapshot copies one organization's setup, not its data, so every new client can start the way you want. Set one organization up as your template, take a snapshot of it, and apply it to a client in one step.
A snapshot can hold Sites, Funnels, Workflows, Pipelines, Custom fields, Forms, Booking calendars, Products, Checkouts and Templates. Contacts, conversations and connected accounts stay behind: no people, messages, bookings, orders or files are copied, and each client connects its own accounts.
Take a Snapshot#
- On the Snapshots tab, click Take a snapshot.
- Choose the Organization to copy from, and give the snapshot a Name and, optionally, a Description.
- Under What to copy, tick what you want. Funnels bring their site with them, and checkouts bring their products.
- Click Take snapshot. A message says how many items were stored.
Apply a Snapshot to a Client#
- On the snapshot, click Apply to a client.
- Choose the Client organization. A snapshot cannot be applied to the organization it was taken from.
- Check What will be added. Leave Switch workflows on as they were off to have every workflow arrive switched off for you to review first.
- Click Apply snapshot. A summary shows what was added and what was kept.
What to expect after applying:
- It is applied in one step: if that step fails, nothing is changed.
- What the client already has under the same name is kept, and applying the same snapshot twice adds nothing twice.
- Sites arrive unpublished, forms as drafts and booking pages switched off, each at a new address.
- A setting that pointed at a person or a connected account arrives empty, for the client to choose its own.
To start every new client on a plan from a snapshot, choose it under Where a new client starts when you edit the plan. The snapshot's menu also has What's inside, Rename and Delete. Deleting a snapshot that a plan uses means new clients on that plan start with an empty workspace instead.
Step 5: White Label: Your Brand on Everything#
White label puts your own name, logo and colors on the app, its emails, your client portal and your sign-in screen. Set it on the agency's White label tab, or under Administration → Settings → White-label; both open the same settings.
- Switch on Use your own brand. Switching it off later keeps everything you saved.
- Under Brand, enter your App name and, optionally, an Assistant name for the AI assistant.
- Upload your Logo, and optionally a Logo for colored backgrounds (used wherever your brand sits on color, such as the sign-in panel) and a Browser tab icon. If your logo already shows your name, switch on The logo already shows the name.
- Set your Primary color (buttons, links and the background of your sign-in panel) and Secondary color.
- Switch on Hide platform branding to remove "Powered by AutomateNexus CRM" from your forms, booking pages, invoices and emails.
- Under Sign-in screen, set a Headline, a Line under the headline, a picture, a Terms link and a Privacy link. A preview shows the sign-in panel as you type.
- Click Save changes.
The file types and size limits for each picture are listed in Setting Up Your Account, Step 7.
Your Brand on Every Client Organization#
What you set on the agency carries to every client organization, field by field. Where a client leaves a field empty, it uses yours, and the settings say so. When you hide platform branding on the agency, it is hidden for every client too.
Whether a client may have a brand of its own depends on its plan: the Its own brand switch on the plan. A client without it sees that its workspace runs under your brand and to ask you for a brand of its own. A client with it can set its own name, logo or colors and keep yours for the rest. Use the inherited brand takes a client back to yours.
Step 6: White-Label Custom Domains#
A domain of your own serves the app, its sign-in screen and your client portal under your brand, so your clients never see ours.
- At the bottom of the white label settings, under Custom Domain Management, type the domain in Add New Domain, such as portal.yourcompany.com.
- Click Add Domain. The DNS records to add appear below it.
- Add those records at the company that runs your domain, then click Verify.
- When the domain shows Active and SSL Enabled, click Visit to see it.
People who sign in on your domain see your branded sign-in screen. On an agency's sign-in screen, people sign in with their email address and a password; Google, Microsoft, LinkedIn and single sign-on are not offered there.
One Storage Allowance for You and Your Clients#
Your agency and the client organizations on its plan share one storage allowance, the same way they share hosted email sending. The Storage & add-ons tab shows how much of it is used, Where it is used with what each client holds, and lets you Add storage for all of them in one place. A client sees how much of the shared allowance is in use and that storage is added by an admin of your agency. A client organization with a plan of its own keeps its own allowance. See Plans, billing, add-ons and storage.
Tips#
- Build your template first. Set one organization up exactly as you want a new client to start, take a snapshot, and attach it to your plans so every sign-up starts ready.
- Check workflows before switching them on. Snapshot workflows arrive switched off by default, so nothing sends from a client's account until you have looked.
- Use the Need a look figure. It counts every client with a billing problem or a sign-up waiting, so you can catch them early.
- Close a plan instead of deleting it when you stop selling it: existing clients stay on it and the link says it is closed.
Troubleshooting#
| Issue | Likely Cause | Solution |
|---|---|---|
| No Agency tab, or no Clients, Plans and Snapshots tabs | Your plan does not include client organizations, or you are not an Owner or Admin | Client organizations and reselling come with the Agency plan, monthly or lifetime. Ask an Owner or Admin, or change plan under Administration → Plans. |
| "Client organizations and reselling come with the Agency plan, monthly or lifetime." | You tried to create a client organization on another plan | Move to the Agency plan, or use workspaces inside your own organization. |
| "Connect your Stripe account to sell plans." | Stripe is not connected | Click Connect Stripe and connect it under Finance → Payment Processors. |
| "Your Stripe key could not be read." | The saved Stripe key no longer works | Save it again under Payment Processors. |
| A client paid but is not set up | The sign-up has not been confirmed by Stripe yet | Click Try again on the Paid, and not set up yet notice, or Check with Stripe. |
| "Snapshots are for agencies" | You are inside a client organization, or your plan does not include client organizations | Open your agency's own organization to take and apply snapshots. |
| "There is no other organization to apply it to" | You have no client organization other than the one the snapshot came from | Add a client first. |
| A client cannot change its brand | Its plan does not include its own brand | Switch on Its own brand on the client's plan. |
| A domain stays at Pending Verification | The DNS records are missing or still spreading | Check the records shown under the domain, wait a few minutes, then click Verify again. |
Related Articles#
- Setting Up Your Account - White-label branding in detail, workspaces and billing basics.
- User Roles and Permissions - Roles, invitations and how client organizations are kept apart.
- Plans, billing, add-ons and storage - Your plan, add-ons and the storage meter.
- Testing Safely Without a Sandbox - Trying changes out before your team or clients see them.
- Payment Processor Setup - Connecting your Stripe account.
- Client Portal - The portal your clients' customers sign in to.