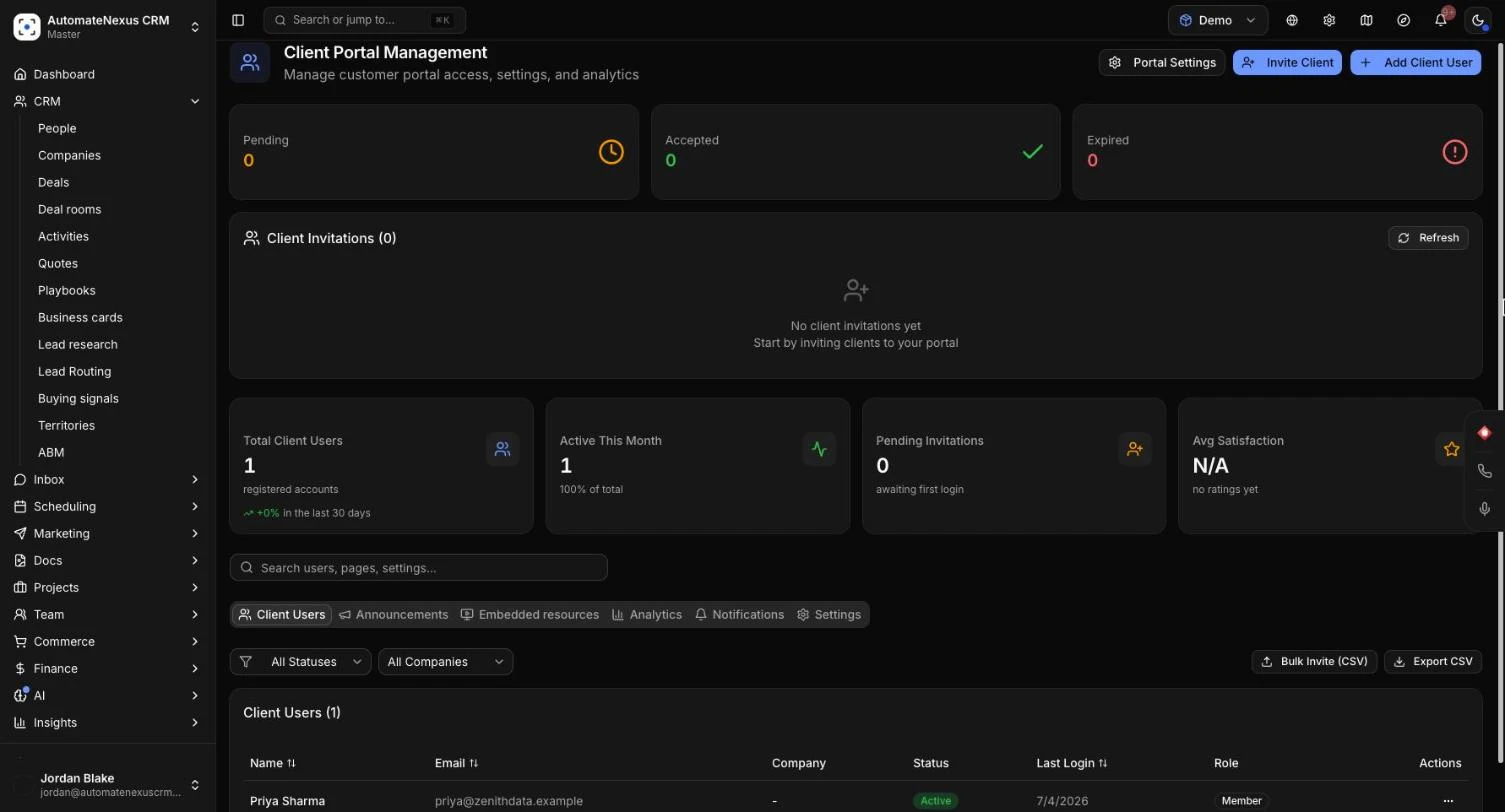
The client portal is a private, branded space where each of your clients signs in to see their own work with you: their projects, what is waiting on them, their documents and files, their invoices, and a way to reach your team. This guide covers inviting clients, choosing which pages they see, the welcome and tour on their first visit, announcements, vaults, embedded videos and documents, the look of the portal, and what your clients can do once they are in. Allow about 20 minutes to set it up.
Before You Start#
- You need to be an owner or admin of your organization to invite clients and change the portal's settings.
- The portal lives under Administration → Portal Management. If you do not see it in your menu, check that the Client portal module is switched on under Settings → Modules.
- Each client login belongs to one customer account. Everything a client sees (projects, invoices, meetings, documents) is that customer's, so make sure the person is linked to the right customer in your CRM before you invite them.
- The portal wears your brand: your logo, name and colours. You change these in one place, Settings → White-label. On the portal's Settings tab you can see the brand as your clients see it and open it with Edit brand.
Step 1: Invite Your Clients#
You can invite a client from their record or from Portal Management. Each client joins from their own invitation link.
From a person's record#
- Go to CRM → People and open the person.
- Open the record's menu and choose Invite to client portal. The person needs an email address first; if they have none you will see Add an email address first.
- Check the Email address and the Name in the greeting, and add a Personal message (optional) if you like.
- Click Send invitation. You will see Invitation sent, and the person gets a link to set up their portal login.
The same menu then changes with the person's status: Resend portal invitation while they have not joined, Send a new portal invitation if the invitation has expired, and Manage portal access once they are in.
From Portal Management#
- Go to Administration → Portal Management and click Invite Client.
- Choose the Customer the portal is for, enter the email address and click Send invitation.
Inviting many clients at once#
- On the Client Users tab, click Bulk Invite (CSV).
- Paste one person per line with the columns email, first_name, last_name, company, for example: john@acme.com,John,Doe,Acme Inc
- Click Send Invitations. You can invite up to 200 people at a time.
Each person is invited to the customer with the same email, or to the only customer with that company name. The list then shows each row as Sent, Email not sent, Skipped or Failed, with the reason.
Following up on invitations#
The Client Invitations list at the top of Portal Management shows each invitation as Pending, Accepted or Expired, with when it was sent and when it expires. Use Resend invitation to send it again (this renews it for another 7 days) or Cancel invitation to withdraw it.
What Your Client Does to Join#
- They open the link in their invitation email.
- They choose Create account and continue, entering their first name and a password of at least 8 characters, or sign in if they already have an account.
- They land in your portal, where your welcome is waiting (see Step 3).
Step 2: Choose What Your Clients See#
Not every business needs every page. Open the Settings tab in Portal Management and find What your clients see. Each page of the portal has a switch, and each switch is saved as soon as you press it.
- Your work: Projects, Tasks, Approvals, Proofs.
- Conversations: Messages, Meetings, Announcements.
- Files and billing: Documents, Vaults, Billing.
- Help and more: Support, plus Analytics, Account Health, Portfolio, Deliverables, Time Tracking, Guides, File Requests, Activity Log, Feedback, Team and Comments.
Switch a page off and it leaves every client's menu. Its address then opens their home page, and anything the home page says about it goes too. The home page itself is always on. You can switch a page back on at any time.
Step 3: Set Up the First Visit#
On the same Settings tab, the A client's first visit card decides what a new client sees the first time they sign in.
- Write your welcome in Custom Welcome Message. It is shown on the client's first visit, and on their home page as A note from your team until they put it away. Leave it blank to show none.
- Under Onboarding Steps, choose what follows the welcome:
- Check their name: asks the client to check the name you have for them and correct it if it is wrong.
- A look around the portal: after the welcome, shows the client around their own portal: what needs them, their projects, your team and the menu.
- Click Save Onboarding Settings.
With the tour on, your client sees Take a look around (or Skip the tour). The tour lights up one part of their real home page at a time and passes over any page you have switched off. They can take it again at any time from the menu under their name, with Take the tour. With the tour off, they see Open your portal instead.
Step 4: Set the Look#
Under the brand on the Settings tab, Light or dark sets how the portal opens for a client who has not chosen for themselves: Light, Dark or Match each client's device. A portal nobody has set opens in light.
Your clients can pick their own look from the portal's top bar or their Profile, and their choice wins over yours.
If your plan includes your own brand, the Custom Domain card on the same tab lets you run the portal on your own address, such as portal.yourcompany.com.
Maintenance Mode#
When you are reorganizing the portal and would rather clients did not see it half done, switch it off for a while.
- In Portal Management, open the Settings tab. Under Portal Configuration, click Edit Settings, switch on Maintenance mode and click Save Changes.
- Your clients now see a We'll be back soon page with your logo instead of the portal, a first visit included. They can sign out from it.
- You and your team still see the portal as usual, with a line across the top saying maintenance mode is on.
- Switch it off the same way and clients see the portal again the next time they open it.
Maintenance Mode#
When you are reorganizing the portal and would rather clients did not see it half done, switch it off for a while.
- In Portal Management, open the Settings tab. Under Portal Configuration, click Edit Settings, switch on Maintenance mode and click Save Changes.
- Your clients now see a We'll be back soon page with your logo instead of the portal, a first visit included. They can sign out from it.
- You and your team still see the portal as usual, with a line across the top saying maintenance mode is on.
- Switch it off the same way and clients see the portal again the next time they open it.
Step 5: Preview the Portal#
Go to Administration → Preview as Client to see the portal the way your clients do. A bar across the top says Admin preview; click Back to admin to return to the CRM. The first-visit welcome is skipped in a preview, since it is only for real clients.
Announcements#
Announcements let you tell every client something at once: a day you are closed, a new service, a change to how you work.
- In Portal Management, open the Announcements tab and click New announcement.
- Write a Title and a Message.
- Switch on Important to list it first in the portal, marked.
- Optionally pick a Last day it is shown. Leave it empty to show it until you take it down.
- Click Put it out now, or Save as a draft to finish it later.
Once it is out, it appears in each client's portal with a count in their menu until they have looked, in their notifications, and in the email that follows. Beside each announcement that is out you can see how many clients have seen it. From its menu you can Edit it (clients see the change at once and are not told a second time), Take it back to a draft, or delete it.
Vaults: Shared and Private Files#
A vault is a place for files and notes you keep for one client in their portal, such as brand assets, contracts or login details. Your client can read what is in a vault; only your team can change it.
- Open the client's record in CRM → People and choose the Portal tab.
- Click New vault and give it a Name and an optional description.
- Under Who can open it, choose:
- Shared: everyone at this client with a portal login, now and later.
- Private: only the people you choose. Their teammates do not see it at all.
- Click Make vault.
- Fill it: click Upload files (each file can be up to 50 MB), or open the vault's menu for Add from Documents, Add a note or Embed a resource.
Add from Documents puts the same file in the vault, not a copy: it stays in Documents, and taking it out of the vault leaves it there. Your clients are told in their portal and by email when something new goes in, and can preview PDFs and pictures right in the vault.
Embedded Videos, Documents and Boards#
Instead of sending a link, you can show a video, document or board inside the portal itself. Supported share links come from YouTube, Vimeo, Loom, Google Docs, Sheets, Slides or Drive, Miro, Figma, Trello, Notion and Airtable.
- For resources for every client, open the Embedded resources tab in Portal Management and click Embed a resource. For one client only, use Embed a resource on their record's Portal tab.
- Paste the Share link and give it a Title.
- In Show it on, choose Home, Projects, Documents or Guides, or No page: only inside the chosen vaults.
- Under Who sees it, choose Every client or Only the clients and vaults I choose.
- Click Add resource.
Managing Client Users#
The Client Users tab lists everyone with a portal login, with their company, status and last login. Filter by status or company, or click Export CSV. From each person's menu you can:
- Edit user to change their details.
- Suspend User to sign them out until you choose Reactivate User. A suspended client sees Your portal access is paused.
- Reset Password to email them a link to choose a new password.
- Remove portal access to sign them out for good. Their customer record, projects, invoices and documents stay as they are.
The Analytics tab shows portal activity and support tickets from the portal, and the Notifications tab sets which events notify your clients and how.
What Your Clients Can Do#
- Home says what is next and what is waiting on them, each with the button that deals with it: approve, review or pay. The menu shows a count beside anything waiting on them.
- Billing lists every invoice made out to them, whichever workspace it was made in, with its balance and a Pay button. Tabs for Payments, Quotes and Retainers sit beside Invoices, and Download Statement saves their invoices as a file.
- Support lets them open a New ticket and follow it. They can click Attach files to send up to 5 files, 10 MB each, with a ticket. Your team sees them on the ticket under Sent by the client.
- Profile holds Language and display: the language the portal is written in for them, Light or dark, and High Contrast for stronger borders and text. Each change shows at once.
Tips#
Troubleshooting#
- "Choose a customer": the portal shows one customer's projects, invoices and documents, so the invitation needs one. Pick the customer, or create the customer first.
- "Invitation created, email not sent": the invitation exists but the email did not go. Resend it from the Client Invitations list.
- "No portal login yet" when resetting a password: the person has not accepted their invitation. Resend the invitation instead.
- A bulk invite row is Skipped with "No customer with this email": add a company column for that row, or create the customer first.
- "That link cannot be embedded": paste a share link from one of the supported services listed above. Links must start with https://.
- "A file is too large": each vault file can be up to 50 MB.
- "Open to no one yet: choose who can open it": a private vault has nobody chosen. Edit the vault and choose at least one person.
- A client sees "We'll be back soon": maintenance mode is on. Switch it off under Settings → Portal Configuration in Portal Management.
- A client sees "We'll be back soon": maintenance mode is on. Switch it off under Settings → Portal Configuration in Portal Management.
- A client cannot find a page: check that its switch is on under What your clients see.