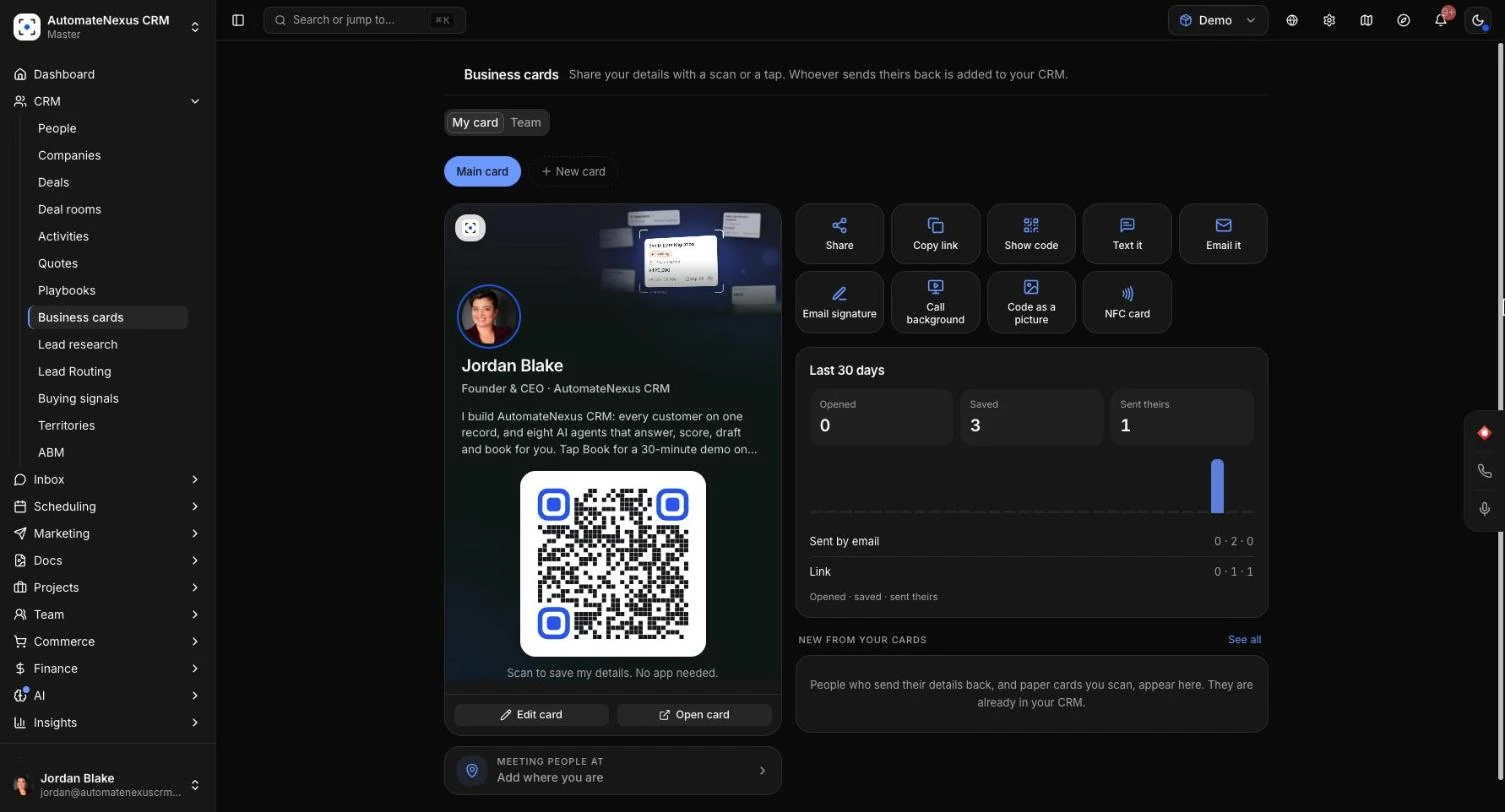
Business cards in AutomateNexus CRM give everyone on your team a digital business card that lives on their phone. People scan your code or open your link and save your details to their phone's contacts in one tap, with no app. When they send their own details back, they are added to your CRM as a lead you own, with where you met. The card scanner works the other way round: photograph a paper card and the new person is filled in for you. This guide is for anyone who meets people at events, on site or on calls, and for owners and admins who set up cards for the team. Making your first card takes about a minute.
Before You Start#
- Business cards are under CRM → Business cards. You can also open your own card from your profile menu with My business card.
- Your card is filled in from your profile, so check that your name, photo, job title and phone are up to date first.
- Every member can make their own cards. Owners and admins can also make and edit cards for the team and set the company look.
- Scanning a paper card uses AI: your workspace's own AI provider, or a small amount of AI credits. See AI Provider Configuration.
Make Your Card#
- Go to CRM → Business cards and stay on the My card tab.
- Click Make my card. Your card is made straight away, filled in from your profile, in your company's colours.
- Click Edit card to change anything. Changes reach everyone you have already shared the card with, so there is nothing to send again.
- Click Save card.
Click Open card to see the page exactly as a visitor sees it.
What You Can Change#
- Style: choose one of three looks. Classic is light with your photo at the side, Centred is light with a larger photo in the middle, and Dark is dark with your colour as a glow.
- Pictures: your Photo, your Logo and a Banner, a wide picture across the top of the card (3:1). Without a banner, your colour is used.
- About you: Name, Pronouns, Job title, Department, Company and a line about what you do.
- How to reach you: Email, Mobile, Work phone, Website, Booking link and Address. Your booking page is put in the booking link when you have one.
- Links: up to 12 links, such as your social pages or a portfolio, each with the name shown on the card.
- Colour: pick one of the ready colours or type in your own.
When People Get Your Card#
- Let them send their details back: visitors can send you their details, and they are added to your CRM as a person you met.
- Write a follow-up email for me to approve: a follow-up is written for you and waits in Approvals until you send it. Their record also reminds you the next day.
- Email them my card when they send theirs: they get your card by email so they can save you too.
- Add them to: if your organization has more than one workspace, choose which workspace new people go into.
This Card#
- Address: the end of your card's web address. If you change it, the old address stops working, along with any QR code printed with it.
- Card is on: turn a card off and its address shows a page saying the card is not in use.
- Delete card: its address and every code printed with it stop working. The people it brought in stay in your CRM.
Have More Than One Card#
You can have up to five cards, for example one for everyday work and one for events. Click New card beside your cards at the top of the My card tab. Each card has its own address, code and numbers.
- Name for this card: a name only you see, such as "Events".
- Make this my main card: your main card is the one the app shares first.
Set Where You Are Meeting People#
Before an event or a visit, tell your card where you are, so everyone you meet keeps it on their record.
- On the My card tab, click Meeting people at (it says Add where you are until you set it).
- Type the place, such as a conference, a client's office or a dinner, and click Save.
Everyone who sends their details through your card, and every paper card you scan, is added with this place. Click Clear when you are done.
Share Your Card#
The My card tab has a button for every way people share a card:
- Show code: your QR code as large as the screen allows, for someone across the table. You can also tap the code on your card.
- Share and Copy link: send your link from your phone's share sheet, or copy it.
- Text it and Email it: opens a text or an email with your link in it.
- Email signature: Add to my CRM signature puts your card in the signature of the emails you send from the CRM, or Copy for Gmail or Outlook to paste it into your email signature settings there.
- Call background: a background for video calls with your card's code in the corner, in Light, Dark or Your colour. Set it as your background in Zoom, Google Meet or Teams and anyone on the call can scan it.
- Code as a picture: downloads your code as a picture, for print or slides.
- NFC card: puts your card on any blank NFC card, sticker or key ring, so a tap on a phone opens your card. On a phone that can write NFC tags, press Write to a tag and hold the tag against the back of the phone. Otherwise, copy your card's NFC link and write it with a free NFC writer app.
On a phone, tap + and choose Show my card to open your code at full size in one step.
What Visitors See#
Your card's page shows your photo, name, title and company, buttons to call, text, email, book or visit your website, and your links as tiles. A button stays at the foot of the screen:
- Exchange contacts, when you let people send their details back. The visitor enters their first name and an email or a phone number (company, job title and a note are optional), ticks that you may keep their details and contact them, and taps Save contact & send mine. Your contact saves to their phone and you get theirs. They can choose Only save [your first name]'s contact instead.
- Save contact, when sending details back is turned off. It saves your contact to their phone.
People You Meet Come Back as Leads#
When someone sends their details through your card:
- They are added to your CRM as a lead you own, with the source Business card and where you met. If someone in the workspace already has their email or number, that person is used instead and only their empty fields are filled in.
- A note goes on their record saying they shared their details with you, where, and anything they wrote.
- Your "New lead" workflows run for them, as they would for a form.
- You are told in the app and on your phone.
- If you turned it on and they gave an email, a follow-up email is written for you to approve, and they are emailed your card.
The newest people show under New from your cards on the My card tab. Click See all to see everyone who came from a business card on People.
See How Your Card Is Doing#
The Last 30 days panel counts how many people Opened your card, Saved your contact and Sent theirs, with a bar for each day. Below it, How people came splits the numbers by the way they reached you: QR code, NFC tap, wallet pass, email signature, sent by email, sent by text, video call background or link.
Team Cards and the Company Look#
The Team tab lists everyone in your organization, how many have a card, and each card's opened, saved and sent-theirs totals since it was made. Anyone can open a teammate's card from here.
Owners and admins can also:
- Click Make card beside anyone who has No card yet. The card is filled in from their profile.
- Click Edit beside a card to change it for them.
- Set the Company look at the top of the tab: Company name, Website, Logo and Colour. New cards start with these. Turn on Same on every card under any of them to lock it, so it is the same on every card and members cannot change it. Click Save company look.
A locked field shows Set by your company in each member's card editor.
Scan a Paper Business Card#
Photograph a business card and the new person is filled in from it: name, email, phone, job title and company.
- On a computer, go to People, click + Person and click Scan a business card at the top of New person. On your phone, tap + and choose Scan a business card.
- Take a photo of the card, or choose one. The card is read and the form is filled in.
- Check what was filled in. Where you met starts with the place set on your own card, and you can change it here.
- Leave Keep the photo of the card in their files ticked to keep the picture on their record.
- Save the person.
People added this way are marked as met by business card, so they also appear under New from your cards.
Scan a Pile of Cards at an Event#
After you save, the form says who was added and the button becomes Scan the next card. The place you met, the owner, the stage, the type and the tags stay as they were, so a pile of cards goes in one after another. Close the form when you are done.
Tips#
Troubleshooting#
- "That address is taken. Try another.": another card already uses that address. Choose a different one under This card.
- "This card is not in use": the card was turned off or deleted. Turn on Card is on, or share your current card again.
- "Reading a card uses AI: set up an AI provider, or add AI credits, in Settings.": connect your own AI provider or add AI credits, then scan again.
- "Nothing could be read on that picture.": take the photo again with the card filling the picture, in good light.
- A visitor cannot send their details: they need a first name and an email or a phone number, and must tick the box agreeing that you may keep their details.
- "Nothing was written.": hold the NFC tag still against the back of the phone and try again, or use an NFC writer app.