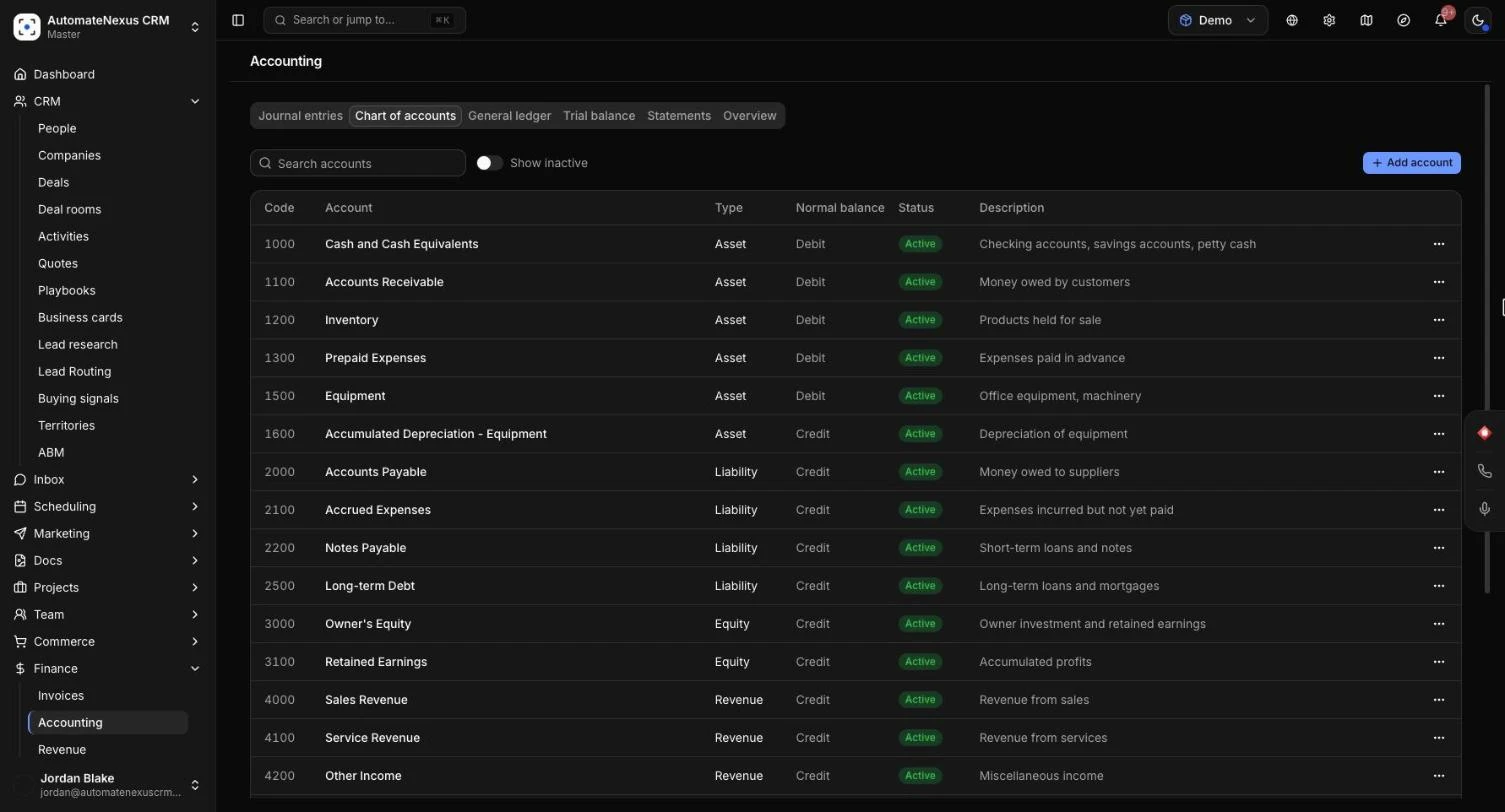
The Accounting page in AutomateNexus CRM keeps your business books: a chart of accounts, the journal entries that move money between those accounts, a ledger for each account, a trial balance, and three statements (a balance sheet, an income statement, which is your profit and loss, and a cash flow statement). It is for owners, office managers and bookkeepers who want their books in the same place as their customers and invoices. Your workspace starts with a ready-made chart of accounts, so you can record your first entry in about five minutes.
Accounting works from the entries you record. Invoices, payments and payroll in the CRM are not added to the books for you: you record them as journal entries, or keep your books in QuickBooks Online and let the CRM send your invoices and payments there.
Before You Start#
- Module: Accounting is part of the Quotes & invoicing module. If you can't find it in the sidebar, check that the module is on under Settings → Modules.
- Organization: the books belong to the organization you are working in. If you manage more than one, choose the right one from the organization menu first. Each organization has its own accounts and entries.
- Access: everyone on your team in the organization can open Accounting and read the books. Changing them (adding, editing, posting or reversing journal entries, and changing the chart of accounts) takes the Manage accounting permission. Owners and Admins have it; an Owner or Admin can give it to other roles under Administration → Access → Roles and permissions, for example to a Bookkeeper role. Client portal users can't see Accounting.
- Currency: amounts are shown in your workspace currency.
Opening Accounting#
- In the sidebar, open Finance → Accounting.
- The page has six tabs: Journal entries, Chart of accounts, General ledger, Trial balance, Statements and Overview.
The tab you choose is kept in the page address, so a refresh or a shared link opens the same tab.
How the Books Work#
A few words appear on every screen, so here is what they mean:
- Account: a bucket for one kind of money, such as your bank account, the money customers owe you, rent or sales. Every account has one of five types: Asset (what the business owns), Liability (what it owes), Equity (what belongs to the owners), Revenue (money earned) and Expense (money spent running the business).
- Journal entry: one thing that happened, such as paying rent or getting paid by a customer. Each entry has two or more lines, and each line is a Debit or a Credit on one account.
- Debit and credit: the two sides of every entry. In each entry the debits and credits must add up to the same amount. Assets and expenses grow with debits; liabilities, equity and revenue grow with credits.
- Draft and posted: a new entry is saved as a Draft, which does not change the books. When you Post it, its amounts go into the ledger, the trial balance and the statements. A posted entry is never edited; to undo it, you Reverse it.
Set Up Your Chart of Accounts#
The Chart of accounts tab lists every account with its Code, Account name, Type, Normal balance, Status and Description.
The Starter Accounts#
A new workspace starts with a standard set of accounts you can use as they are, rename or add to. For example:
- Assets: 1000 Cash and Cash Equivalents, 1100 Accounts Receivable, 1200 Inventory, 1300 Prepaid Expenses, 1500 Equipment, 1600 Accumulated Depreciation - Equipment.
- Liabilities: 2000 Accounts Payable, 2100 Accrued Expenses, 2200 Notes Payable, 2500 Long-term Debt.
- Equity: 3000 Owner's Equity, 3100 Retained Earnings.
- Revenue: 4000 Sales Revenue, 4100 Service Revenue, 4200 Other Income.
- Expenses: 5000 Cost of Goods Sold, 6000 Operating Expenses, 6100 Salaries and Wages, 6200 Rent Expense, 6300 Utilities Expense, 6400 Depreciation Expense, 6500 Interest Expense.
If the tab says No accounts yet, add your own accounts with the steps below.
Add an Account#
- Click Add account. The New account dialog opens.
- Enter the Account code, for example 1010. Codes can be up to 20 characters, and no two accounts can share one.
- Choose the Account type: Asset, Liability, Equity, Revenue or Expense.
- Enter the Account name, for example "Business checking".
- Add a Subtype (optional), such as "Current asset", if you like to group accounts further.
- Check the Normal balance. It is set for you when you choose the type: Debit for assets and expenses, Credit for liabilities, equity and revenue. Change it only for an account that works the other way round, such as accumulated depreciation.
- To place the account under another one of the same type, choose it in Parent account (optional). This field appears when there is an account of the same type to choose.
- Add a Description (optional) saying what goes in the account.
- Leave Active on so the account is offered when you write journal entries.
- Click Add account.
Edit, Deactivate or Reactivate an Account#
- To change an account, open the three-dot menu on its row, click Edit, make your changes and click Save account.
- Accounts are never deleted, because posted entries point at them. To stop using one, open the three-dot menu, click Deactivate and confirm. It keeps its history in the ledger and the statements but is no longer offered for new entries. The confirmation tells you if any drafts still use it.
- To see inactive accounts, switch on Show inactive above the list (the number in brackets is how many there are). Open the three-dot menu on one and click Reactivate to use it again.
Use Search accounts to find an account by name, code or type.
Record a Journal Entry#
- Open the Journal entries tab and click New entry. The New journal entry dialog opens.
- Check the Entry date. It starts as today; change it to the day the money moved. Reports use this date.
- Optionally, enter a Reference (optional), such as an invoice or check number.
- In Description, say what the entry records, for example "October rent".
- Under Lines, fill in each line: choose the Account, add a Line description if you want one, and enter the amount in either Debit or Credit. The entry starts with two lines; click Add line for more, or the bin icon to remove one (an entry always keeps at least two).
- Watch the Totals under the lines. When the two sides match, it says "Debits and credits are equal." If not, it shows how much they differ by.
- Click Save as draft.
The entry gets a number such as JE-2026-0001, from the year of its entry date, and appears in the list as a Draft. Nothing reaches the books until you post it.
Two Common Examples#
- You paid this month's rent from the bank: debit 6200 Rent Expense and credit 1000 Cash and Cash Equivalents, both for the rent amount.
- A customer paid you for a service: debit 1000 Cash and Cash Equivalents and credit 4100 Service Revenue, both for the amount received.
Amounts can be typed with a comma between thousands (1,200.50) or a decimal comma (120,50). They can't be negative and can have at most two decimals. If you are not sure which side a line goes on, ask your accountant; the amounts must match either way.
Post, Edit or Delete a Draft#
Click any entry in the list to open it. You see its date, reference, description and lines with their totals. A draft has three buttons at the bottom, and the same actions are in the three-dot menu on its row:
- Edit draft: change the date, reference, description or lines, then click Save draft.
- Post entry: confirm with Post. The entry's amounts go into the ledger, the trial balance and the statements, and its status changes to Posted. An entry can only be posted when it has lines and its debits and credits are equal.
- Send for approval: if your workspace has approval switched on for journal entries (Settings → Approvals), the button reads Send for approval instead. An owner or admin approves the entry and it is posted then, in the name of the person who sent it. Until then it stays a draft marked Waiting for approval; editing or deleting it takes it out of approval. If it is not approved, it stays a draft and you are told.
- Delete draft: confirm with Delete draft. The draft and its lines are removed. Drafts never reached the books, so no figures change.
Posted entries can't be edited or deleted. To correct one, reverse it and record a new entry.
Reverse a Posted Entry#
Reversing takes a posted entry's amounts back out of the books while keeping both on record.
- Open the posted entry, or use the three-dot menu on its row, and click Reverse entry.
- Choose the Reversal date. It starts as today. If you pick a day before the entry's own date, a note tells you so.
- Click Reverse entry.
A new entry is added and posted on the reversal date, with the same accounts and the debits and credits swapped. Its description starts with "Reversal of" and the original entry's number, and its reference is the original's number. The original now shows as Reversed: it says which entry reversed it, and the new entry says which one it reverses. Click either number to jump between them. The original amounts count in the books up to the day before the reversal, and not after it.
Find an Entry#
The Journal entries tab lists every entry, newest first, with its number, Date, Description, Reference, Amount and Status.
- Type in Search entries to find an entry by its description, number or reference.
- Use the menu next to the search to show All entries, Drafts, Posted or Reversed.
General Ledger: One Account's History#
- Open the General ledger tab.
- Click Choose an account and pick one. You can type to search; inactive accounts are marked "(inactive)".
The ledger lists every posted line on that account, oldest first, with its Date, Description, Reference (the entry's reference, or its number if it has none), Debit, Credit and a running Balance. Above the table you see the account's type and whether it grows with debits or credits. Drafts appear here once they are posted.
Trial Balance: Check the Books Add Up#
The trial balance lists every account with a balance and shows it in the Debit or the Credit column, with totals at the bottom. In healthy books the two totals are the same.
- Open the Trial balance tab.
- Choose the day in As of. It starts as today and includes every posted entry dated on or before that day.
- Check the label next to the date: Balanced when the totals match, or Out of balance with a Difference row under the totals.
- Click Export CSV to download the trial balance as a spreadsheet file, with each account's code, name, type, debit, credit and currency.
Statements: Balance Sheet, Profit and Loss, Cash Flow#
- Open the Statements tab.
- Choose the period: Year to date, This month, Last month, This quarter, Last quarter, Last year or Custom range. With Custom range, pick a start date and an end date.
- Read the note under the period: the balance sheet covers everything posted up to the end date, and the income statement and cash flow cover the days from the start date to the end date. Drafts are not counted.
- Switch between Balance sheet, Income statement and Cash flow.
Balance Sheet#
What the business owns and owes on the end date. The Assets card lists each asset account and Total assets. The Liabilities and equity card lists your liabilities and equity accounts, then Retained earnings (all profit and loss to date), which is all revenue less all expenses posted since your books began, then Total equity and Total liabilities and equity. Accumulated depreciation is taken off your assets. The two totals should match; if they don't, a warning says how much they differ by.
Income Statement (Profit and Loss)#
What the business earned and spent in the period: each revenue account and Total revenue, each expense account and Total expenses, and Net income, which is revenue less expenses. A loss shows in brackets, for example ($1,200.00).
Cash Flow#
Where your cash came from and went in the period, in three parts: Operating activities (running the business, starting from net income), Investing activities (buying or selling things like equipment, vehicles or property) and Financing activities (loans and owner money). At the bottom you see Net change in cash, Cash at beginning of period and Cash at end of period.
The cash flow statement counts an asset account as cash when its name or subtype includes cash, checking, savings, bank, petty or money market. It puts accounts whose name or subtype mentions things like equipment, property, building, land, vehicle, machinery, investment, depreciation or long-term under investing or financing.
Export the Statements#
Click Export CSV to download all three statements for the chosen period in one spreadsheet file, with a currency column, ready to send to your accountant.
Overview#
The Overview tab gives a quick picture of the books:
- Four figures: Accounts (and how many are active), Journal entries (and how many are posted), Drafts waiting to be posted, and Total assets posted as of today.
- Journal activity: a chart of the debits in posted entries for each of the last six months.
- Recent journal entries: the last five entries you created, with their status.
- Balances by type: the number of accounts and the total balance for each account type.
Your Books in Reports#
The Financial tab under Insights → Reports uses your books too. Its Expenses are the amounts posted to expense accounts, Cash in and out shows what was posted to your cash and bank accounts each month, and Account movement lists each account's debits and credits in the period. Its revenue comes from the invoices you issue and the sales you complete, not from the journal.
QuickBooks Online#
If your accountant works in QuickBooks Online, you can connect it so the CRM sends your customers, invoices and payments there. This sync does not send the journal entries or accounts on the Accounting page. See the QuickBooks Online guide for how to connect it.
Tips#
Troubleshooting#
"No organization chosen"#
The books belong to an organization. Choose one from the organization menu to see its accounts and entries.
"Couldn't load the books"#
The accounts or entries could not be read. Check your connection and click Try again. If it keeps happening, refresh the page or try again in a few minutes.
I can't save an entry#
The message under the lines says what to fix:
- "Debits and credits must be equal." The totals differ; the line under Totals says by how much.
- "A line is a debit or a credit, not both." Move one of the amounts to its own line.
- "Enter a debit or a credit." or "Choose an account." A line is missing its amount or account. Fill it in or remove the line.
- "Amounts are never negative: use the other column." Enter the amount without a minus sign in the other column.
- "Use at most two decimals." Round the amount to cents.
- "Say what the entry is for." Fill in the Description.
"Another account already has that code."#
Each account code can be used once. Choose a different code, or edit the existing account instead. Inactive accounts keep their codes too; switch on Show inactive to find them.
An account is missing from the account list in an entry#
It has been deactivated. Switch on Show inactive on the Chart of accounts tab, open its three-dot menu and click Reactivate.
"Only drafts can be changed. This entry has been posted or removed."#
Someone posted or deleted the entry while you were editing it. Posted entries can't be changed; reverse the entry instead.
The trial balance says "Out of balance"#
The balance sheet shows the same thing as "Assets and liabilities plus equity differ by" an amount. It means a posted entry has unequal debits and credits. Check the Trial balance as of the same day and look through the posted entries for that period.
A posted entry doesn't show in a statement#
Check its Entry date. Statements use the entry date, not the day it was posted. An entry dated after the end date is left out, and the income statement only counts entries dated inside the period.
"You can read the books, not change them"#
Your role doesn't have the Manage accounting permission, so the buttons that change the books are hidden. Ask an Owner or Admin to switch it on for your role under Administration → Access → Roles and permissions.
"You do not have permission to change the books."#
You are not a member of this organization, or you are signed in as a client portal user. Ask an Owner or Admin to add you to the organization's team.
Related Articles#
- Invoices, Retainers & Recurring Billing: bill your customers and record their payments.
- Payroll: keep pay periods, hours and pay records for your team.
- QuickBooks Online: send your customers, invoices and payments to QuickBooks.