Overview#
The Workflow Builder in AutomateNexus CRM is the automation engine that allows you to design, configure, and run automated workflows to streamline your business processes. From simple task assignments to multi-step sequences involving emails, text messages, record updates, invoices, quotes, and webhook calls, the Workflow Builder eliminates repetitive manual work and ensures consistency across your operations.
With the Workflow Builder, you can automate lead follow-up, deal progression, customer onboarding, internal tasks, and much more. Each workflow consists of exactly one trigger and one or more action steps connected together on a visual canvas; Branch and Wait Until steps add decision logic. Everything on the canvas is executed for real by the engine — nothing is simulated.
Prerequisites#
- An active AutomateNexus CRM account with the Automations module enabled for your organization (Settings → Organization → Modules)
- Familiarity with the records you plan to automate (contacts, customers and leads, deals, tasks)
- Any email templates (Marketing → Marketing Campaigns → Templates) or SMS templates (Marketing → SMS campaigns → Templates) you intend to use should be created in advance
- For Send SMS and Send WhatsApp steps, the Twilio integration connected under Settings → Integrations → Communications
Accessing the Workflow Builder#
Step 1: Open the Automation page#
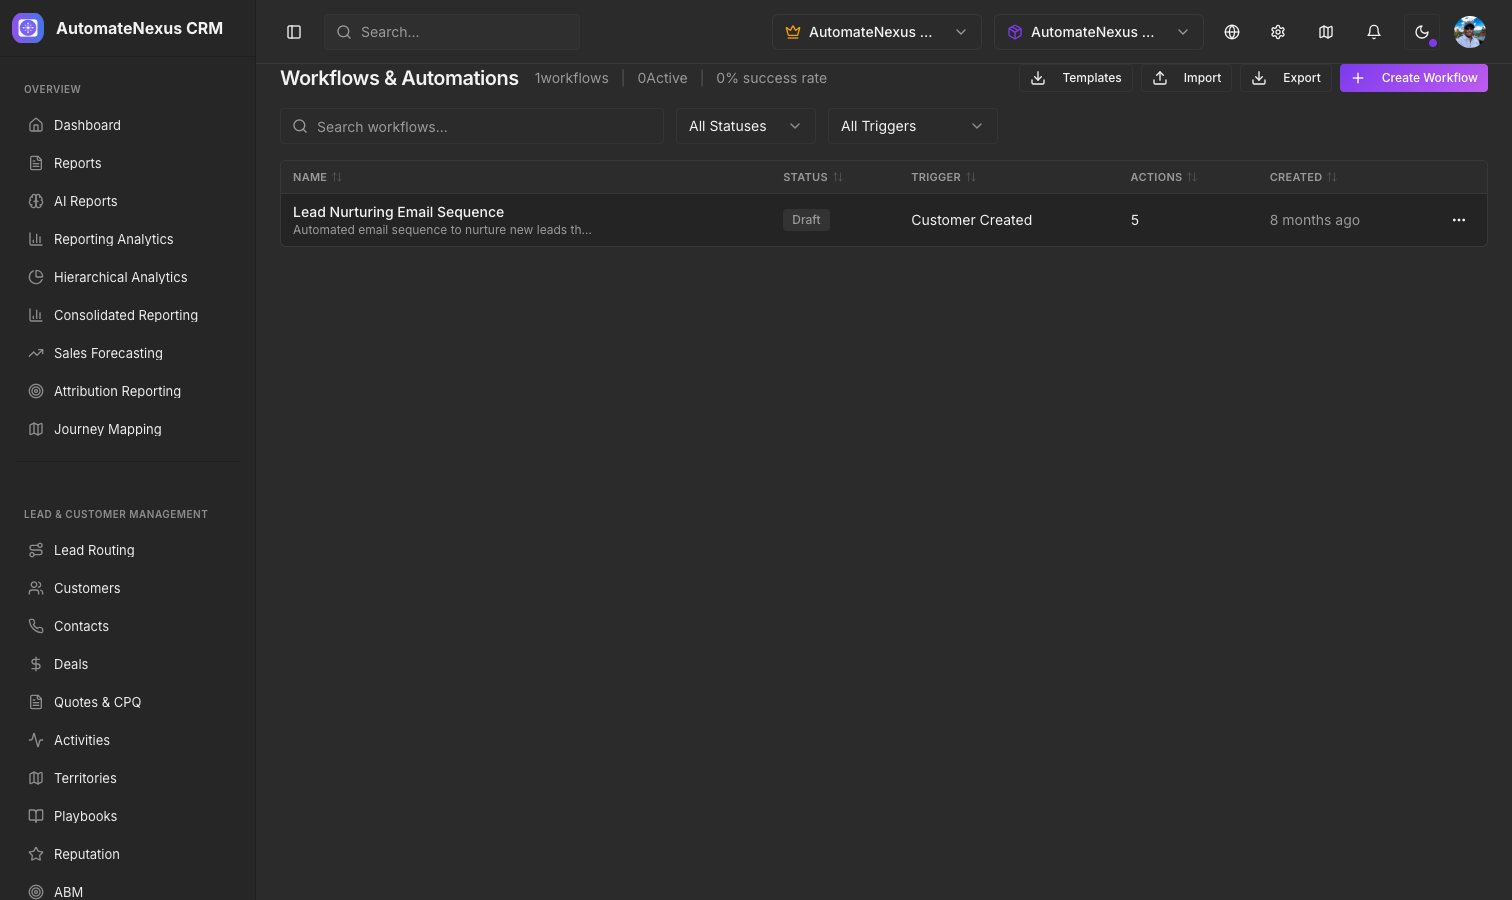
From the main navigation sidebar, click Projects → Workflows. The page that opens is titled Automation. You can also reach it from the Automations link at the top of Marketing → Marketing Campaigns.
Step 2: The Workflows tab#
The page opens on its Workflows tab (an Overview tab beside it summarizes your active workflows). At the top you see four figures: Workflows (with how many are active and paused), Runs today, Success rate across recent runs, and Never run. Below them a second row of tabs — Workflows, Templates, Analytics and History — sits above the list of existing workflows. Each row shows the workflow's name and description, its status (Active or Paused), its trigger, the number of runs, the success percentage and the last run date, with Pause or Resume and Edit buttons and a menu (⋯) holding Run now and Settings. Use the search box and the status and trigger filters to narrow the list.
Step 3: Create a New Workflow#
Click the + New workflow button in the upper-right corner. The builder opens full screen with the title Create Workflow. Type a name in the Workflow name field (required) and, optionally, a description. Choose a descriptive name such as "New Lead Assignment" or "Deal Closed Follow-Up" so your team can easily identify it later. Build the workflow on the canvas; when the footer reads Ready to save, click Create Workflow (until then the footer lists the items that still need attention).
What you will see: The Workflow Builder canvas is a visual editor with a dotted background. On the left is the Steps palette, listing the triggers under Trigger — one per workflow and the Actions beneath them. The center area is the canvas where you drag, connect and arrange nodes; it has zoom controls, a minimap and an Auto-arrange button. Selecting a node opens its configuration panel on the right. When you edit an existing workflow, the header also carries the Active/Paused switch and the Test, Run now, Enrollments and Versions buttons.
Trigger Types#
Every workflow begins with a trigger node, and a workflow has exactly one. Click a trigger in the palette (or drag it onto the canvas) to set or replace the trigger; changing the type resets its configuration. Select the trigger node to configure it in the right-hand panel. AutomateNexus CRM's triggers fall into three groups:
Time-Based Triggers#
Time-based triggers start the workflow on a schedule or when a date on a record draws near. Use these for recurring processes and time-sensitive reminders.
- Schedule: Run the workflow on a recurring cron schedule. Enter a standard 5-field Cron Expression (minute, hour, day, month, weekday), for example
0 9 * * 1-5for 9:00 AM on weekdays, and a Timezone. - Date Approaching: Fire for a record whose date is a set number of minutes away — meeting reminders, renewals, due dates. Choose the Object (Meetings, Bookings, Deals, Customers, Contacts, Tasks or Projects), the Date field (for example
start_timefor meetings,expected_close_datefor deals,due_datefor tasks) and Minutes before (1440 for a day, 10080 for a week). Each record enters once. - No Contact For…: Fire for customers or contacts with a phone number that nobody has texted, or logged an activity for, in the chosen number of days. A record re-enters after the same number of days.
To run something a fixed time after an event, start with an event trigger and add a Wait / Delay step before the action — for example a follow-up email 48 hours after a form submission.
Event-Based Triggers#
Event-based triggers respond to actions taken within the CRM in real time.
- Record Created: Fires when a new record is created in the chosen Object (Customer / Lead, Deal, Contact or Task).
- Record Updated: Fires when a record in the chosen object is updated. Set Watch Field to fire only when a particular field changes, such as a deal's Stage or a contact's Lead Source; leave it blank for any change.
- Deal Stage Changed: Fires when a deal moves to the stage typed in To Stage (for example
wonornegotiation), or on any stage change when left blank. - Form Submitted: Fires when a tracked form receives a submission. Enter a Form ID to limit it to one form.
- Email Received: Fires when an inbound email lands in a connected inbox, optionally filtered by From Contains and Subject Contains.
- Contact Replied: Fires when a known contact or customer writes back to an email your organization sent them.
- Email Opened and Email Link Clicked: Fire the first time a tracked email is opened, or the first time a link in it is clicked (optionally only links containing a given text, such as
/pricing). Mail privacy proxies can report opens on their own, so clicks and replies are firmer signals. - SMS Received: Fires once per text message that arrives on one of your numbers, optionally only when the message contains a keyword or is the first message of a conversation.
- Booking Event: Fires when a public booking is created or its status changes to Confirmed, Cancelled, Rescheduled or Completed.
- Invoice Event: Fires when an invoice is created, sent, viewed by the customer, partially paid, paid in full, overdue or cancelled.
- Quote Event: Fires when a quote is created, sent, opened by the customer, accepted, declined, expired or approved internally, or when a renewal quote is drafted.
Each record-based trigger carries an Enroll each record setting: Once — never re-run for the same record (the default), Again after a number of days, or Every time the trigger fires. Once is the safe choice — a record saved five times enters the workflow one time.
Manual Triggers#
The Manual trigger runs a workflow on demand instead of listening for an event. Start it with Run now (in the workflow's ⋯ menu on the list, or in the builder header), enroll one record by hand from the builder's Enrollments panel (Enroll, then pick a Contact, Customer / Lead or Deal), or select several records in the Deals, Contacts or Customers list and choose Enroll in workflow. Records already mid-run in the workflow are skipped. The same enrollment options are available for workflows with other triggers.
Condition Nodes#
Decision logic comes from two steps that split the flow into two paths.
Branch (If / Else)#
The Branch (If / Else) step evaluates one condition and follows the matching path. Select the node to set its Field / Value (a token from the trigger record, such as {{record.lead_score}}, or a literal value), an Operator (equals, does not equal, contains, is greater than, is less than, is empty, is not empty) and the Compare To value. For example:
{{record.value}}is greater than10000, then follow the TRUE path for high-value deals{{record.lead_source}}equalsWebinar, then create a task for the webinar sales team{{record.email}}is not empty, before a Send Email step
A Branch holds one condition and has two outgoing ports, labelled TRUE and FALSE. For AND logic, place a second Branch on the TRUE path; for more than two paths, chain Branch steps. Either path can lead to further actions or branches.
Wait Until#
Wait Until pauses the run until the recipient responds to the most recent Send Email or Send SMS step in the run, or until a deadline passes. Choose what to Wait for (a reply to the last email, the last email to be opened, a click in the last email, or a reply to the last text) and how long to wait under Give up after. The run then continues down the HAPPENED or the TIMED OUT port. Open and click waits need Track opens and clicks left on in the Send Email step.
Action Nodes#
Action nodes perform the actual work in your workflow. Click an action in the palette to append it to the end of the flow, drag it onto the canvas, or click the + button under a node to insert a step there (Add a step). AutomateNexus CRM provides these action types:
Send Email#
Send a tracked email from your organization. Pick a saved Template or write the Subject and Body on the step. The Recipient defaults to {{record.email}}, the record that started the run; type an address to send elsewhere. Send From chooses one of the organization's sending accounts (the default account when left blank). Turn on Marketing email for promotional mail: it adds an unsubscribe footer with your postal address and skips anyone who has unsubscribed; leave it off for transactional mail such as confirmations, replies and reminders. Track opens and clicks (on by default) is needed by Wait Until steps and by the Email Opened and Email Link Clicked triggers. Personalization tokens such as {{first_name}}, {{record.name}}, {{record.company}} and {{record.title}} are supported in the subject and body.
Create Task#
Create a task in the CRM. Set the Title (for example Follow up with {{record.name}}), an optional Description, the Priority (Low, Medium or High), Due In (hours) and, optionally, the user id to Assign To.
Update Record#
Set a field on a CRM record. Choose the Object (Customer / Lead, Deal, Contact or Task), the Field and the New Value, which can be a literal such as won or a token such as {{record.value}}. Record ID defaults to the trigger record. Common uses include setting a lead's Status, changing a deal's Stage or Assigned To, or filling a contact's Next Follow-up Date. Each Update Record step changes one field; add another step for a second field.
Log Activity#
Record an activity on the CRM record with a Subject, a Type (Note, Call, Email, Meeting or Task) and a description.
Send SMS and Send WhatsApp#
Send SMS texts the record through your Twilio integration, from a saved SMS template or a message typed on the step, with optional AI personalization per recipient and an optional send window (quiet hours) outside which the step is deferred rather than sent. Turn on This is a marketing message for promotional texts: it sends only to numbers with recorded SMS marketing consent. Send WhatsApp sends through your Twilio WhatsApp sender; starting a conversation needs an approved template and the person's recorded WhatsApp opt-in.
Webhook#
Send an HTTP request to an external URL. Configure the URL, the Method (POST, PUT, PATCH or GET) and an optional JSON Body; when the body is left blank, the trigger record is sent. Use webhooks to notify third-party systems or trigger external automations.
Additional Action Types#
- Create Invoice, Send Invoice, Send Invoice Reminder: Create an invoice for the record's customer (from a won deal, a new customer or a booking) and email it with its PDF and payment link, or send a payment reminder that is skipped once the invoice is paid.
- Create Quote, Send Quote, Send Quote Follow-up: Draft a quote from a deal's line items, a saved quote template or the record's value, email it with its PDF and accept link, or send a follow-up nudge for an open quote.
- Create Project: Start a project for the record's customer, optionally from a project template with its tasks.
- Wait / Delay: Pause the workflow for a Duration in seconds, minutes, hours or days before proceeding to the next node.
A run ends when its last connected step finishes, so no explicit end step is needed.
Connecting Nodes#
To connect nodes on the canvas, drag from the round port at the bottom of a node to the port at the top of the target node. Branch and Wait Until nodes have two bottom ports, one per path, and the connector carries a chip with the path's label. Each port holds one outgoing connection; connecting it somewhere else moves it. To remove a connection, hover over it and click the × that appears, or select it and press Delete or Backspace. The same keys delete a selected step, as do the trash icon on the node and the Delete Step button in its panel.
Nodes execute in the order defined by the connections, starting from the trigger. The engine only runs forward: the builder refuses a connection that would create a loop, and a step that is not reachable from the trigger is marked Not connected — will never run. You can rearrange nodes by dragging them on the canvas, or click Auto-arrange to lay the whole flow out again; the connector lines adjust automatically.
Testing Workflows#
Using Test#
Before relying on a workflow, save it, reopen it with Edit and click Test in the header. The Test this workflow dialog asks which record to Run against — search your contacts, customers and leads, or deals. The engine runs every step against that record and shows exactly what each one would do (recipient, subject, message, task title, branch decisions) but sends nothing, writes nothing and skips waits. Unsaved changes on the canvas are included. If the workflow contains Wait Until steps, choose whether the test should assume the event happens or assume the waits time out. Consent, unsubscribe lists and quiet hours are checked for real; sends, tasks and record updates are only reported.
Reviewing Test Results#
After Run test completes, the dialog shows a trace: one line per step with a status icon, the step's duration and a plain-language summary such as "Would email jane@acme.com — Quick question", or a Branch step's evaluation and result. Email previews, text messages and webhook bodies appear under their steps. Test runs are also kept in the Enrollments panel, marked Test, so you can review them later. Use Run again after adjusting the canvas.
Run now#
If you need to execute a workflow for real, use Run now. It runs the last saved version immediately — emails, texts and record changes included — so use it with care and preferably on test data. Run now is only available when the workflow is active and has no unsaved changes; save first.
Enabling and Disabling Workflows#
Each workflow's status shows as Active or Paused in the Workflows list. An active workflow listens for its trigger and runs automatically (or on demand for a Manual trigger). To pause one, click Pause on its row or turn off the Active switch in the builder header; click Resume or turn the switch back on to start listening again. A paused workflow starts no new runs, cannot be enrolled or run with Run now, and a run that was waiting when the workflow was paused is cancelled when it would have continued. Testing still works on a paused workflow. Workflows are paused and resumed one at a time.
Workflow Templates#
AutomateNexus CRM includes a gallery of pre-built workflows for common business processes. Open the Templates tab on the Automation page, search or filter by category (All, Sales, Marketing, Support, Operations) and click Deploy Template on a card. Each card shows the trigger, the number of actions, a summary of what they do and an estimate of the time saved. The gallery includes:
- New Lead Instant Response: Every new lead gets an acknowledgement email within seconds and a rep gets a call task due in two hours.
- Deal Stage Playbook: Every stage change is logged on the deal; a win also creates the onboarding kick-off task.
- Welcome New Contacts: A personal welcome email and an onboarding task when a new contact is created.
- Lead Nurturing Drip: A timed marketing drip for new contacts — welcome now, a value email at day 3, a case study at day 7 — that honours unsubscribes and stops early when they reply.
- Re-engage Quiet Customers and Text, then Email if No Reply: Reach customers nobody has contacted in 30 days by text, with a marketing email to follow when there is no reply.
- Meeting Reminder by SMS: Text the customer an hour before a meeting starts.
- Send NPS After Deal Closed: Seven days after a deal is won, email the customer a one-question survey.
Other templates cover follow-up sequences that stop on reply, reply handoff, pricing-link clicks from hot leads, inbound texts, quiet-customer follow-ups and welcome journeys by engagement. Deploying a template creates a workflow of your own: open it with Edit and modify the trigger, steps and content to match your requirements.
Execution History and Logs#
Viewing Execution History#
Open the History tab on the Automation page. It lists every run across your workflows, newest first, with its status (Completed, Partial, Failed or Running), the workflow name, when it started and how long it took. Use the search box, the status filter and the workflow filter to narrow the list, and Refresh to reload it.
Execution Details#
Click a run to expand it. You see when it started and completed, its duration and status, the Trigger Data it received, and a numbered list of Steps. Expand a step to see its Input, Output and, for a failed step, its Error message. Runs with failures also show an Error Details box.
Enrollments for One Workflow#
Inside the builder, Enrollments opens a panel listing every record enrolled in that workflow: the record, its status (Completed, Waiting, Running, Failed or Cancelled), the version it runs on, what a waiting run is waiting for and when it continues, and every step it has taken with what that step actually did. Filter by All, Active, Done, Failed or Tests. A waiting or running run can be stopped with Cancel run; a finished one can be started again with Enroll again.
Versions#
Every save creates a version. The Versions panel in the builder lists them newest first with the trigger and step count; Restore… loads an older version onto the canvas, and saving then makes it the newest version. Runs already in flight keep the version they started on.
Error Handling#
When an action step fails — a webhook returns an error, an email has no valid recipient — the step is recorded as failed with its error message and the run carries on with the steps connected after it. The run then finishes with the status Partial when other steps succeeded, or Failed when none did. A Send SMS step outside its send window is deferred rather than failed, and a Send Email or Send SMS step that skips a recipient because of an unsubscribe or missing consent says so in its summary. Find failed runs on the History tab, in the builder's Enrollments panel, and under Recent Errors on the Analytics tab, which also shows each workflow's runs, successes, failures, success rate and average duration.
There is no automatic retry of a failed step. After fixing the cause, use Enroll again on the run in the Enrollments panel to send the record through the workflow once more.
Best Practices#
- Name workflows descriptively: Use clear, consistent naming conventions like "[Module] - [Trigger] - [Action]" (e.g., "Deal - Stage Changed - Send Follow-Up Email").
- Start simple: Build and test a minimal workflow first, then add complexity incrementally.
- Branch early: Place Branch steps near the beginning of your workflow, for example to check that a record has an email address before a Send Email step.
- Document your workflows: Use the description field to summarize the business process; it appears under the workflow's name in the list.
- Monitor history regularly: Check the History tab and the Analytics tab's Recent Errors at least weekly and address recurring errors promptly.
- Avoid re-running records unintentionally: Be cautious with Record Updated triggers whose actions also update records. Keep Enroll each record on Once unless you need repeats, and use Watch Field so the trigger fires only on the change you care about. The canvas itself never allows a loop between steps.
- Test with real records: Use Test against records that closely resemble your real data to catch edge cases before the workflow runs for real.
- Keep marketing and transactional messages apart: Turn on Marketing email (and This is a marketing message for texts) for promotional sends so unsubscribes and consent are honoured, and leave it off for confirmations and reminders.
Troubleshooting Common Issues#
| Issue | Possible Cause | Solution |
|---|---|---|
| Workflow does not trigger | Workflow is Paused, or the trigger's filters do not match the event | Click Resume on the Workflows list; check the trigger's Object, Watch Field, To Stage or keyword settings, and the Enroll each record setting if the record has already been through once |
| Email not sent | Record has no valid email address, or the recipient has unsubscribed from marketing email | Add a Branch checking that {{record.email}} is not empty before the Send Email step; open the run in the Enrollments panel and read the step summary ("Skipped — …") |
| Webhook returns error | Incorrect URL or JSON body | Verify the URL, method and JSON body in the Webhook step, and read the HTTP status recorded in the step's output |
| Duplicate executions | Enroll each record is set to Every time, or several workflows listen for the same event | Set Enroll each record to Once, and review which workflows share the trigger |
| Conditions not matching | Data type mismatch or unexpected field values | Use Test to see the Branch step's evaluation ("field operator value → TRUE/FALSE") and correct the token or the comparison value |
| Run now is disabled | Workflow is paused or has unsaved changes | Resume the workflow and save; Run now executes the last saved version |
Related Articles#
- Email Marketing and Campaigns — Send one-off campaigns to lists and automate drips with workflows
- Sales Sequences & Multi-Step Outreach — Build reply-aware outreach sequences on the workflow canvas