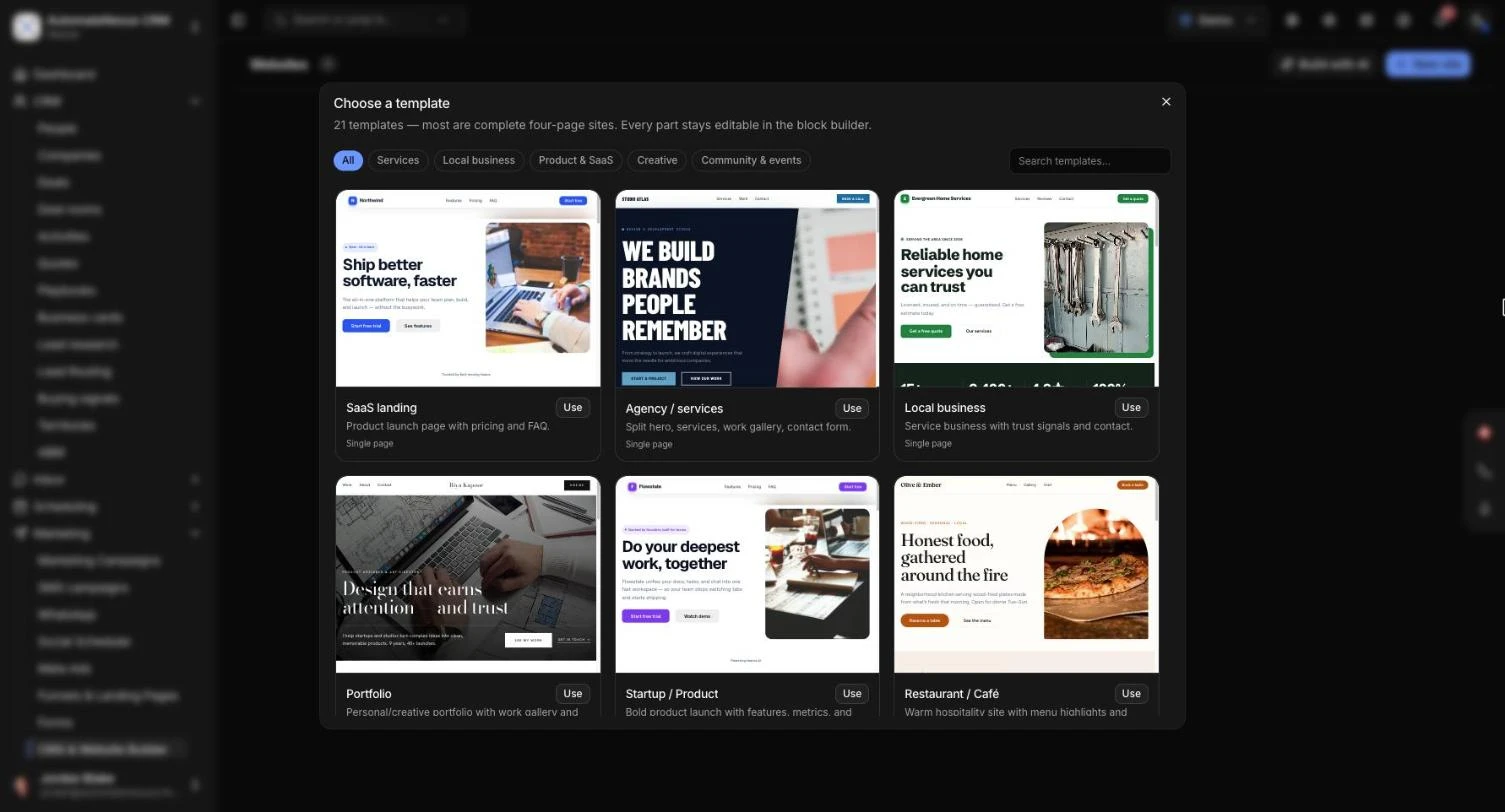
The website builder in AutomateNexus CRM makes a full website for your business from a few sentences. You tell the assistant who you are, where you are and what a visitor should do, and it writes the pages in front of you, with photographs and your business details. After that you change anything by asking in your own words, or by hand in the block builder. You can publish to your own domain, send a client a review link, and keep a copy on GitHub. Allow about 15 minutes for a first site, plus the time a new domain takes to connect.
Before You Start#
- Open the builder from Marketing → CMS & Website Builder. The page is called Websites and lists every site in your workspace.
- The assistant uses AI. It runs on your own AI provider key or on AI credits. If neither is set up, the assistant says so: add a key in Administration → Integrations → AI providers, or AI credits in Administration → Plans. You can still build a site by hand without AI.
- A site can go live on its own domain on a paid plan. During a free trial it stays at its staging address.
- Have your phone number, email, address and opening hours ready. The site uses exactly what you type and leaves out anything you leave blank.
Step 1: Build a Site with AI#
- On the Websites page, click Build with AI.
- In the message box, describe the business: who it is, where it is, what it offers, what sets it apart and what a visitor should do. A few sentences is enough. If you prefer, click one of the examples under Or start from an example and write your own business over it and type your own details over it.
- Optionally, open Before you start, if you like and choose a Look, the Pages, a Palette and the Type. Leave them on surprise me and the assistant chooses what suits the business.
- Fill in The business's details (phone, email, address and opening hours) if you want them on the site from the start.
- Press Enter to send. You watch each page being written on the right. A site takes about a minute; a model on your own computer takes a few minutes.
When it is done, the site opens in the editor with the assistant beside it. A site the assistant builds comes with photographs: it looks for a public-domain picture that suits each section and keeps a copy with your own images, so there is nothing to pay and no credit to give.
Other Ways to Start#
- New site → Browse templates… opens the template gallery. There are 21 templates, including industry sites such as Plumbing & HVAC, Law firm, Dental clinic, Real estate agent, Fitness studio and Salon & spa. Each opens on a real photograph, and its pictures are copied into your own images so you can swap any of them.
- New site → Blank page starts an empty site you build yourself.
Step 2: Change the Site by Asking#
With the site open, type what you want in the assistant's box, for example "add a page about our guarantee", "change the opening hours to 8 to 6" or "make the look warmer". The assistant can rewrite or add sections, add and remove pages, change the menu, the footer and the look, and find photographs. It shows each step as it works (such as Changed a section or Added a page); click a step to see that place on the site. When it has finished, it checks the site and puts right what it can.
- Undo: every step has Undo this. Earlier steps offer Go back to before this.
- Talk about one section: click Point at a section of the site under the message box, then click the section.
- Name a page or section: type @ in the box.
- Add your own pictures: click Attach a picture to use on the site (up to six at a time).
- Shortcuts: type / to see what you can ask for by name: Choose another look, Add the business's details, Find photographs for the site, Check the site and put right what you can, Write the search titles and descriptions, Undo the last change, Edit this page by hand, Set up the sales agent, Publish the site and Start a new conversation.
Use Hide the assistant and Show the assistant to give the site more room.
Choosing the Model#
The assistant runs on the model shown in the menu in its message box. With OpenRouter connected, the newest models from Anthropic, OpenAI and Google are listed first, with a line on what each suits, and you can search for any other model. Without a key of your own, it uses Our model (AI credits). Your workspace's owners and admins choose the model for everyone; anyone else can pick a different one for themselves only.
Step 3: Choose a Look#
A look is a whole design for the site: its type, its buttons, its icons and how each section is laid out. There are eight: Editorial, Studio, Bold, Trade, Luxe, Friendly, Warm and Corporate. Changing the look keeps your words, colours and pictures, and you can go back.
- Ask the assistant, or type / and choose Choose another look.
- In the block builder, click Theme and choose under Look. The same panel holds Colors, Typography and Layout.
Step 4: Edit by Hand in the Block Builder#
Click Edit by hand above the site to open the page in the block builder. Each page is made of blocks you can add, drag into order and change.
- Drag a block from the Blocks list on the left onto the page, or click it to add it. You can search the list with Search blocks….
- Or click Add section for a ready-made section, or Templates to load a whole page.
- Click a block on the page to edit its Content and Section style on the right: background, width, spacing, scroll animation (such as Fade in or Rise up) and separate settings On phones.
- Hover a block for its tools: move, duplicate, copy, Ask AI to rewrite this section, Save to library and delete.
The blocks are grouped as Structure (Navbar, Hero, Footer), Content, Social proof (including Testimonial, Pricing, Price list / menu and Team), Media (Image, Gallery, Video, Map, Embed, Blog posts), Convert (Call to action, Button, Contact form, Embedded form, Booking page) and Layout (Columns, Text columns, Spacer, Divider, Custom HTML). Columns can hold any other block.
Sections you save with Save to library are shared with your whole organization and appear on the Saved tab, ready to insert on any page as a fresh copy. The editor saves as you work; the label shows Saved, Saving… or Not saved.
Photographs#
In any image field, open the media library. Your images holds what you have uploaded. Stock photos searches free photographs: type what the photo should show and click Search. The one you choose is copied into your images, so your site never depends on another website to show it, and no credit is required.
Pages and Version History#
Use the page menu above the site to switch pages or find one with Find a page…. Each page's options include Page settings (page name, URL slug and its search title and description), Duplicate page, Version history, Set as homepage and Delete page.
Versions appear as you edit and publish. In Version history, click Restore… on any version to bring it back. The page as it was before is kept as a version too, so a restore can be undone.
Forms, Bookings and a Blog#
- Embedded form: choose one of your CRM forms. Only forms set to Public in the form builder are listed, because visitors could not open the others. Submissions arrive in the CRM like any form.
- Contact form: a simple form you set up in the block itself: its fields, button label and success message.
- Booking page: choose one of your booking pages and show it as an Embedded calendar or a Button that opens it. Bookings land in your CRM calendar like any other.
- Blog posts: shows this site's published posts, newest first. Write posts in the Blog Manager (Marketing → Blog in the sidebar): choose the site under Select Site:, click New Post, then save it as a draft or publish it.
Forms do not send anything from the editor's preview. They work on the published site and at its staging address.
Step 5: Publish#
- Click Publish (after the first time it reads Publish changes).
- A health check runs first. It looks at links, images, search titles and headlines on every page, plus colour contrast. It also flags reviews, figures and team members the AI wrote as examples, so you can replace them with real ones.
- If it finds something, choose Fix first or Publish anyway. You can run the check any time with Health.
Your site is then live at its staging address (the Subdomain under Settings → General) and on your own domain if you have connected one. View live opens it. To take it offline, click Unpublish.
Every page you publish states its own address as its canonical address. Business details entered under Settings → Local SEO are published on every page as local business information for search engines. The default search title, description and share image are under Settings → General → SEO & social.
Put the Site on Your Own Domain#
- In the editor, click Settings and open the Domain tab.
- Type the address people will use, such as www.yourbusiness.com, and click Connect.
- Add the two records shown where you manage your domain's DNS (often where you bought it): one to Prove the domain is yours and one to Point the domain here. Use the copy buttons for the name and the value.
- Wait for the domain to show Live. A change to DNS can take up to an hour to be seen; click Check again to look sooner. Until then it shows Waiting for DNS or Finishing set-up.
The security certificate is issued and renewed for you. A website can have two addresses, one with www and one without: add the second under Add a second address, and visitors to one are sent on to the Main address. What you publish reaches your domain within a couple of minutes.
Send a Client a Review Link#
- Open Settings → General and find Review links. Click New link.
- Fill in Who is it for?, and optionally their email and a password. Choose when it Stops working (in 7, 14 or 30 days, or never).
- Choose whether They can comment and whether They can approve or ask for changes, then click Create and copy and send the link.
Your client needs no account. They move through the site as it is, published or not, use Pin a comment to point at something on the page, and click Approve or Request changes. Their comments and decisions appear in the editor's Feedback panel, where you can reply; your reply shows on their link. You can stop a link working at any time.
For a simple look without comments, the Preview link on the same tab lets anyone with the link view the draft. Click Reset link to stop old links working.
Publish to GitHub or Download the Site#
- GitHub: on the GitHub tab, click Connect GitHub account, then enter the Repository as owner/repository-name. Every publish then deploys to that repository, so you can host it on GitHub Pages, Netlify, Vercel or Cloudflare Pages. The connection belongs to the website, so any teammate can publish.
- Without GitHub: click Download site (.zip) to get every published page as static files you can upload to any host.
More Site Settings#
- Forms: choose where the site's form submissions go: CRM Contacts, a Webhook (such as Zapier or Make) or Both.
- Sales agent: an AI assistant that answers visitors and books meetings. See The Sales Agent on Your Website.
- Engage: an Announcement bar, a Popup, a Chat widget and a Cookie consent banner.
- Code: custom code in the page head or before the end of the page.
- Traffic: daily views and views by page for the last 7, 30 or 90 days.
- Local SEO: your business name, address and category, plus Redirects to keep old links working after you rename or remove a page.
Troubleshooting#
- "AI runs on your own AI provider key or on AI credits": add a key in Administration → Integrations → AI providers, or AI credits in Administration → Plans.
- "A site goes live on its own domain on a paid plan": the site keeps working at its staging address; choose a plan to use your domain.
- The domain shows "Needs attention": check that both records match exactly, then click Check again.
- "This website is not published yet": publish it, and it is shown on its domain.
- "That address is taken": another page already uses that URL slug. Choose a different one in Page settings.
- "Published, but GitHub deploy failed": open Settings → GitHub to reconnect or retry.
- "Form block has no form selected": choose a form in the block, or remove it, before you publish.