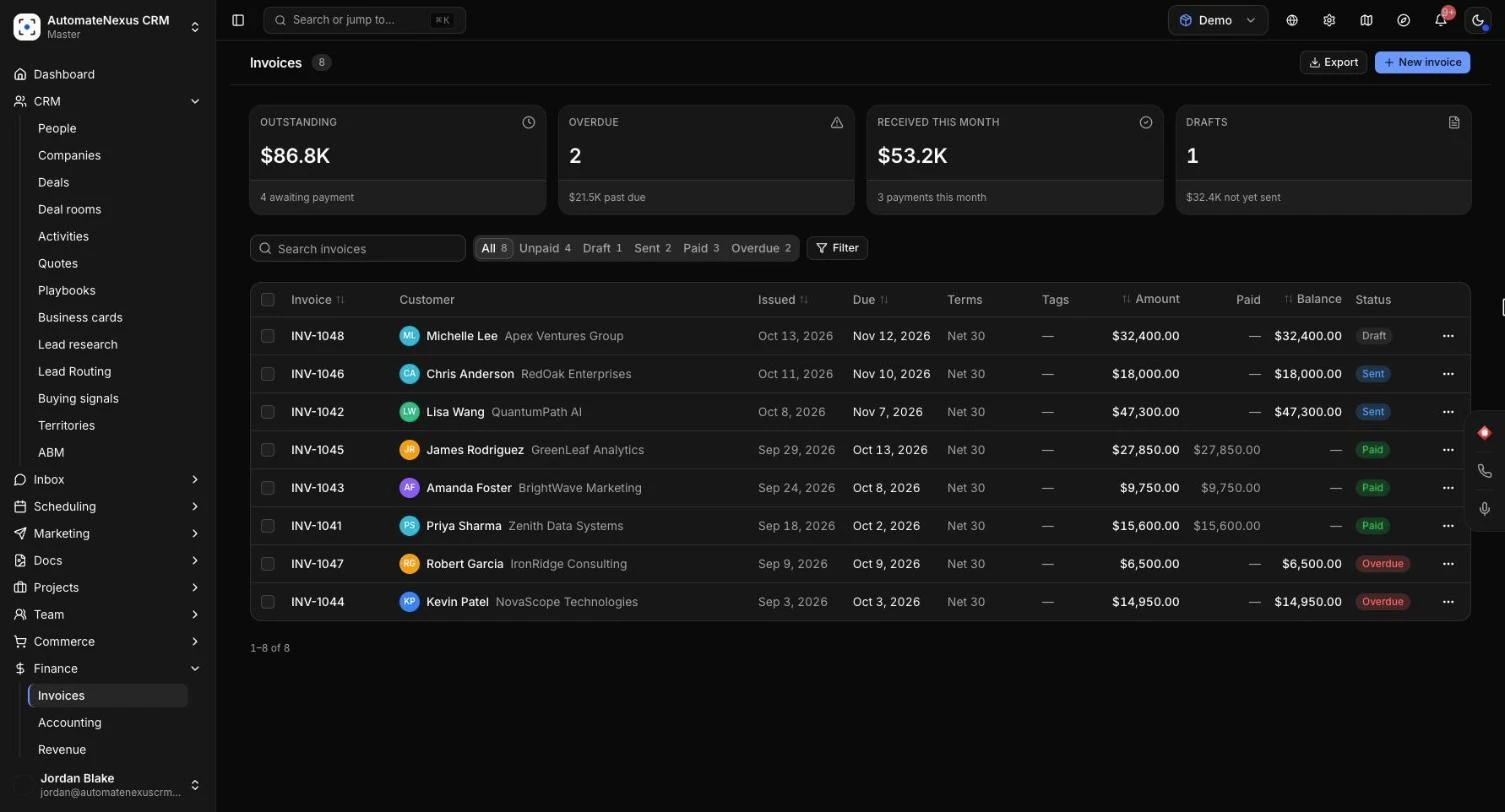
Invoices in AutomateNexus CRM let you bill a customer, email them the invoice with a link to pay it online, chase it with automatic reminders and see the money land on your Revenue page. Retainers and repeating invoices do the same thing on a schedule, so ongoing work bills itself, and a customer who saves a card is charged automatically. This guide covers creating and sending invoices, payments, credit notes and refunds, recurring billing, retainers, revenue targets and QuickBooks Online. Allow about 10 minutes to set up your defaults and send your first invoice.
Before You Start#
- Connect a payment processor to take payment online. Invoices are paid online through your default processor when it takes invoices, otherwise through Stripe. Stripe, PayPal, Square, Razorpay, Mollie, Adyen, Authorize.Net, Braintree, 2Checkout, Worldpay and Wise all take them. Connect one under Administration → Integrations → Payments (see Payment Processor Setup). Lemon Squeezy and QuickBooks Payments never take an invoice's payment. Without a processor you can still send invoices and record payments yourself.
- Set your invoice defaults. Open Settings → Invoicing to set your numbering, default payment terms, notes, tax, payment reminders, retainer billing and late fees (see Step 1).
- Fill in your organization details. Your company name, address and logo from Settings → Organization print on every invoice and its PDF.
Step 1: Set Your Invoicing Defaults#
- Go to Settings → Invoicing.
- Under Invoice numbering, set the Prefix, Next number, an optional Suffix, the Separator, Year format and Sequence digits. The Next invoice preview shows what the next number will look like. Click Save.
- Set the Default payment terms, Default notes and Default terms & conditions. These are filled in on every new invoice.
- Under On the document, add your Tax ID, Payment instructions (for example your bank details) and a Footer line.
- Under Default tax, set the Default tax rate (%) and the Tax label.
- Under Payment reminders, switch on Send reminders automatically and enter the Days before the due date and Days after the due date, separated by commas. Each reminder is sent once, with the invoice PDF attached, until the invoice is paid.
- Under Late fees, choose a Late fee type (None, Percentage or Fixed amount), the amount and a Grace period (days). The fee is added once to an overdue invoice as a line item after the grace period.
- Click Save defaults.
Step 2: Create an Invoice#
- Go to Finance → Invoices and click New invoice. You can also start one from the Invoices tab on a person, customer, company or deal with New invoice, and the customer is filled in for you.
- Pick the Customer. Their company, address and tax ID show underneath, exactly as they will print in the Bill to block. Click Edit company, address and tax ID to change them, or New customer to add someone without leaving the form.
- Check the Invoice date and choose the Payment terms (Due on receipt, Net 10 through Net 90, or Custom). The Due date is set by the terms, or type your own.
- Set the Currency, and add a PO or reference if the customer gave you one.
- Add a Discount if you need one: Percentage (%) or a fixed amount.
- Under Items, click Add item for each line and enter the Description, Qty and Unit price. The Subtotal, Tax and Total update as you go.
- Optionally set a Late fee for this invoice, add Tags, Notes for the customer and Terms and conditions.
- Click Create invoice. The new invoice opens as a draft.
Editing an invoice later with Edit saves its line items with it, and the Activity history under the invoice says in plain words what changed.
Invoices That Need Approval#
There are two ways to have invoices approved before they go out:
- One invoice at a time: switch on Require approval on the form. Saving it sends it to an owner or admin for approval.
- Every invoice: an owner or admin switches on Invoice under Settings → Approvals. Require approval is then on for every invoice and can't be turned off. A draft shows Needs approval before it is sent; click Send for approval on the invoice when it is ready.
While an invoice waits, it shows Waiting for approval, Send is greyed out, and it has no pay link yet. Remind the approvers is in the More menu. An owner or admin approves or turns it down on the invoice itself or in Settings → Approvals. Turning it down asks for a reason, which is passed to the person who made it. Make the changes and click Send for approval again. Once it is approved, send it as usual.
Owners and admins can approve their own invoices. Other team members can send invoices for approval but can't approve them. Recurring invoices and retainers are still sent on their schedule without waiting for approval.
Step 3: Send It With a Pay Link#
- On a draft invoice, click Send. The customer gets an email with the invoice PDF attached and a link to view and pay it, and the invoice is marked Sent.
- To send it again later, use Send again in the More menu.
- To share the link yourself, for example in a text message, choose Copy pay link from the More menu.
To send many at once, tick them in the list and click Send in the selection bar. Invoices that are paid, voided, waiting for approval or turned down are left out, and the confirmation tells you how many and why.
The More menu also has Preview the customer's copy, Print and Save the PDF to your connected file storage. These, and the pay link, are ready once the invoice has been sent. PDF downloads the same PDF your customer receives.
What Your Customer Sees#
The link opens the invoice on its own page, in your branding. Your customer can:
- Click Pay (with the balance due on the button) to pay through your payment processor. Most open the processor's own payment page. With Braintree they type their card on the invoice page itself; with Wise the page shows your account details, the amount and the reference to send. The payment is recorded on the invoice when the money arrives, and they are not offered the invoice to pay again while it settles.
- Click Download PDF or print it.
- Click Save a card to keep a card on file, so their retainer invoices are charged automatically.
The balance due always counts payments and credit notes, on the page, the PDF, reminders and receipts. A receipt is sent automatically when a payment is recorded. Clients who use your client portal also see every invoice under Billing, where they can pay, open each invoice, and save or replace their card.
Track Invoices and Payments#
The cards at the top of Finance → Invoices show Outstanding, Overdue, Received this month and Drafts. Click one to filter the list. You can also switch between All, Unpaid, Draft, Sent, Paid, Overdue and Voided, search by number, customer or PO, filter by customer, date, tag and amount, and Export the list.
An invoice with some money paid shows Partly paid (or Overdue, partly paid). Invoices past their due date are marked overdue automatically. Each invoice keeps its Payment history, Attachments, Credit notes and Activity history.
Record a Payment Yourself#
- Open a sent or overdue invoice and click Record payment.
- Enter the Amount (it starts at the balance due and cannot be more than what is owed), the Payment date and the Payment method: Cash, Check, Bank transfer, Credit card, PayPal or Other.
- Add a Reference such as a check number, and tick Email a receipt to the customer with the updated invoice PDF if you want one sent.
- Click Record payment. When the invoice is covered it is marked Paid.
To nudge a customer outside the automatic schedule, choose Send a payment reminder from the More menu.
Credit Notes and Refunds#
- On a sent, overdue or paid invoice, choose Issue a credit note from the More menu.
- Under How it is settled, pick one:
- Account credit: takes it off what they owe on this invoice. Credit that covers the whole balance marks the invoice paid.
- Refund to the original payment: the money paid online goes back to their card through your Stripe account, straight away, and is recorded as a credit note. Only for invoices paid online through Stripe, and only owners and admins can do it. Refund a payment made through another processor in that processor, then record it here as Other refund.
- Refund by check: records a check you send them yourself.
- Other refund: records money you give back yourself, such as cash or a bank transfer.
- Enter the Amount and a Reason, then click Issue credit note.
A refund you make in your Stripe dashboard also reaches the invoice it was for. To undo a credit note, click Void credit note on it: the balance due goes back up.
To cancel an invoice the customer no longer owes, choose Void and click Void invoice. It stays in your list as voided. Delete removes it for good with its payments and history, so void it instead when you want to keep a record.
Recurring Invoices#
For a customer you bill the same amount on a schedule, set Repeats on the invoice form to Every week, Every month, Every 3 months or Every year. The form shows when the next invoice will be made. A copy is created on each date as a new draft, or switch on Email each new copy automatically to have it sent without you. The invoice shows a Repeats badge.
Retainers and Autopay#
A retainer is an ongoing agreement, such as a monthly fee or a block of hours, that is invoiced each period.
Where Retainers Come From#
- From a quote: recurring lines on a quote become retainers when the customer accepts it. The first period is on the acceptance invoice. See Quotes & CPQ.
- By hand: go to Team → Time Tracking, open the Retainers tab and click + New retainer. Choose the Customer, a Title and the Retainer Type: Hours-based (with Monthly Hours and an Hourly Rate) or Fixed Fee (with a Monthly Amount). Set the Billing Cycle, Start Date, optional End Date, Auto-renew and, for hours, Rollover unused hours. Switch on Invoice each period automatically, then click Create Retainer.
How Retainer Billing Works#
Retainers set to invoice automatically raise each period's invoice on a daily run: the fee in advance and, for hours-based retainers, last period's extra hours from tracked time. Under Settings → Invoicing → Retainer billing you choose:
- Send retainer invoices automatically: off leaves each one as a draft for you to review and send.
- Days before the period starts: how early each invoice is raised (0 means the first day of the period).
- Pause after unpaid invoices: when a retainer has this many invoices unpaid past their due date, automatic invoicing turns off and you are told. Turn it back on after payment.
Open a retainer's billing from the Billing column of the list. It shows the next period to invoice, what has been invoiced so far and every invoice the retainer raised. Click Invoice the next period now to bill early.
Autopay With a Card on File#
When a customer saves a card from any invoice or from their portal, their retainer invoices are charged automatically instead of chased. In the retainer's billing, Charge the card on file turns on by itself once a card is saved. A declined card is kept apart from an unpaid invoice: the invoice is emailed so they can pay by hand, and you are told. Customers are reminded before a saved card expires.
Renewals are drafted before a retainer's term ends and wait for you on the Renewals tab under CRM → Quotes.
Revenue, MRR and Targets#
Finance → Revenue counts your completed sales and invoice payments, less refunds. The cards show Revenue, this period's target, Average sale and Pending, with a chart by Month, Quarter or Year, a By source table and your Largest sales.
- Click Set target.
- Choose the Period (A month, A quarter or A year), pick which one, and enter the Target amount and an optional note.
- Click Save target. The chart becomes Revenue vs target, and the Targets list marks each one On track, Behind, Missed or Not started.
For recurring revenue, open Insights → Reports and the Recurring tab. It shows Monthly recurring revenue, Paying customers, Customer churn and Lifetime value, the Movements by month (new, expansion, reactivation, contraction and churn) and Retention by cohort.
Invoices, retainers and quotes also have their own tabs on every person, customer, company and deal, and anything that needs chasing shows on your dashboard and in the Today card. Karrie knows about it too, so you can ask her what needs a hand.
QuickBooks Online#
When QuickBooks Online is connected, your invoices go across when they are first sent and follow later changes, payments are applied to their invoice, customers are created the first time you invoice them, and credit notes become credit memos. Payments recorded in QuickBooks come back and mark the invoice paid. Each invoice shows a QuickBooks badge with its sync state, such as QuickBooks: queued. If an invoice is edited, voided or deleted in QuickBooks, the badge says so and an organization admin chooses which version to keep. See Integrations & Marketplace.
Troubleshooting#
- "No payment processor is connected for this workspace, so invoices cannot be paid online": connect Stripe, PayPal or another payment processor under Administration → Integrations → Payments. Your customer sees "This invoice cannot be paid online. Please get in touch with whoever sent it to arrange payment."
- Send is greyed out: the invoice is paid already, was voided, is waiting for approval or its approval was turned down. Hover the button to see which.
- No Approve button on an invoice waiting for approval: only owners and admins approve invoices. Ask one of them, or use Remind the approvers in the More menu.
- No pay link or preview yet: "Preview, print and the pay link are ready once the invoice is sent." Send it first.
- Refund to the original payment is not offered: it needs a payment made online through Stripe. Refund a payment made through another processor in that processor; for cash, check or bank transfer payments, use Refund by check or Other refund.
- "That is more than is still owed": account credit can only cover the balance due. For money already paid, choose a refund.
- A retainer stopped invoicing: it reached the unpaid-invoice limit and its automatic invoicing was turned off. Turn it back on in the retainer's billing once the customer has paid.
- A customer says they paid but the invoice is open: the payment page tells them it is being confirmed and not to pay again. If it still shows a balance the next day, check the payment in your payment processor's dashboard. A Wise transfer shows once it arrives, usually within a day.
Related Articles#
- Payment Processor Setup - Connect Stripe and your other payment processors.
- Quotes & CPQ (Configure, Price, Quote) - Build quotes whose recurring lines become retainers.
- Tasks, Delegation & Time Tracking - Track the hours that hours-based retainers bill.
- Dashboard Overview - See what needs chasing each day.
- Integrations & Marketplace - Connect QuickBooks Online and other tools.