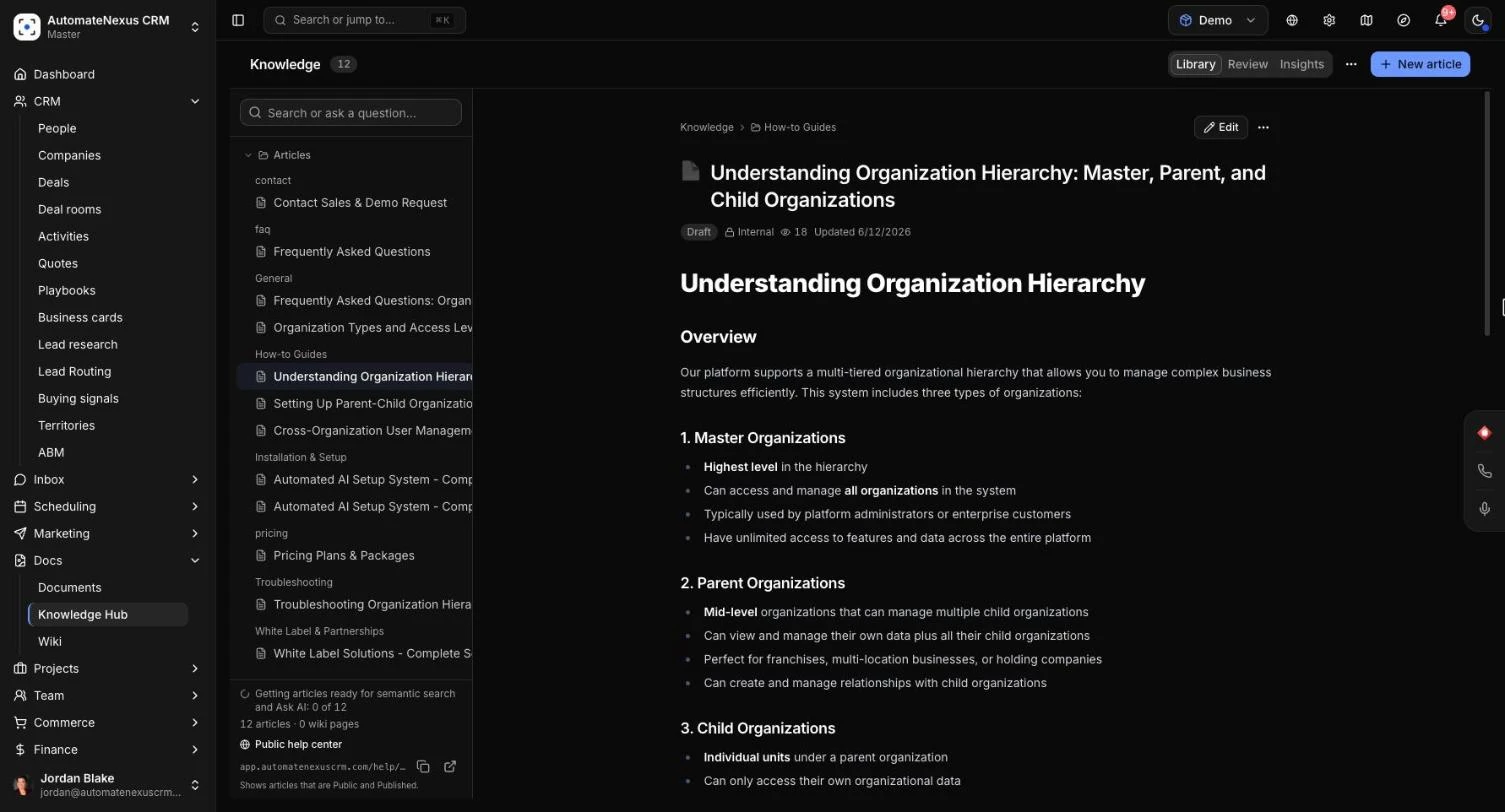
The Knowledge Hub is where your team writes down what it knows: how-to guides, policies, FAQs and standard procedures, in one searchable library. Articles you mark as public also appear in your own help center on the web, where customers can read them without signing in, and the website chat, the AI phone receptionist and your website's sales agent can answer from them. This guide covers writing articles, finding answers with search and Ask AI, the review queue, and your public help center. Allow about 10 minutes for your first article.
Before You Start#
- Open the Knowledge Hub from Docs → Knowledge Hub. The page is called Knowledge.
- Ask AI and the writing helpers in the editor use AI. They run on your own AI provider key or on AI credits. If neither is set up, the app tells you which to add.
- Decide which articles are for your team only and which are for customers. Only articles set to Public appear in your help center.
Step 1: Write an Article#
- Click New article.
- Type a title in Article title, then write the article. Use the toolbar for headings, bold, lists, checklists, quotes, links, tables and code. Switch between Write, Preview and a side-by-side view.
- To start from a ready-made outline, click Template and choose one: Standard Operating Procedure, FAQ Article, How-To Guide, Troubleshooting Guide, Runbook, Onboarding Checklist, Policy Document or Release Notes.
- To polish what you wrote, use AI Refinement: Improve Writing, Simplify, Expand, Summarize, Make Professional or Fix Grammar. You see a preview before anything changes.
- Set the article's details in the side panel (see below), then click Create. After that the button reads Save, and the editor shows Saved or Unsaved changes.
Article Details#
- Category: pick one, or type a new category name. Categories group articles in the library and in your help center.
- Status: Draft, In review or Published.
- Audience: Team only, or Clients (portal) to share it in your client portal.
- Visibility: Internal or Public. Public articles appear in your help center once their Status is Published.
- Pin to sidebar, an Icon, a Cover image URL and Tags.
The panel also shows the article's statistics: words, read time, characters and headings.
Step 2: Find Answers with Search and Ask AI#
- Type in Search or ask a question… at the top of the library.
- Choose Keyword to match the words you typed, or Semantic to find articles by meaning, so a question in your own words finds the right article even when it uses different words.
- Click Ask AI to get a written Answer built from your articles, with the Sources it used. Click a source to open that article.
Every article is indexed for semantic search and Ask AI, and indexed again when its text changes. While new articles are being added, the library shows "Getting articles ready for semantic search and Ask AI" with a count.
Browsing the Library#
The Library tab lists Pinned articles, Recent ones you opened, all Articles by category, SOPs and the team Wiki. Open an article to read it. From an article you can:
- Click Edit, Print or Copy Link.
- Click View public page (public articles only) to open it as customers see it.
- Leave comments for your team, and see whether readers found it helpful under Was this article helpful?.
Step 3: Review Before You Publish#
If your team checks articles before they go out, set an article's Status to In review. It then appears on the Review tab, with a count beside the tab name.
- Open the Review tab.
- Click an article to read it.
- Click Approve to publish it, or Send back to return it to draft.
Step 4: Your Public Help Center#
Your help center is a public page at /help/ followed by your workspace's short name, on the same address you use to sign in to AutomateNexus CRM. It lists every article that is both public and published, by category, with a Search articles… box, and opens each article on its own page. Customers need no account.
- Open an article, set Visibility to Public and Status to Published. Save it. (While an article is Public but not yet Published, the editor reminds you that the help center shows it only once it is published.)
- Find your help center's address at the bottom of the Knowledge Hub's sidebar, under Public help center. Click the copy button to copy it, or the open button to see it as customers do.
- Link to it from your website's footer or your email signature. To share one article, open it and click View public page.
Where Else Public Articles Are Used#
- Website chat: the Messenger on your website shows your help articles and its AI answers from them.
- AI phone receptionist: it answers callers from your public articles.
- Website sales agent: switch on Also answer from your public help articles on its tab. See The Sales Agent on Your Website.
See How Articles Are Used#
The Insights tab shows the number of Articles and Drafts, Total views and the Helpful rating. It lists the Most viewed articles, those Going stale (90+ days) without an update, the Top searches, and what was Searched but not found, which shows you which articles to write next.
Import and Export#
Click the More actions menu (the three dots) beside the tabs:
- Import markdown or .zip: bring in .md, .markdown or .txt files, one at a time or many in a zip.
- Export all as .zip: download every article as files, to keep a copy or move them elsewhere.
Tips#
Troubleshooting#
- "This help center or article doesn't exist or isn't public": the article's Visibility is still Internal, its Status is not Published, or the address is wrong. Copy the address from Public help center at the bottom of the Knowledge Hub's sidebar.
- "No public articles yet": no article is both Public and Published. Publish at least one public article.
- An article is missing from semantic search or Ask AI: new articles take a moment to be indexed. The library says how many are not ready yet, and carries on the next time the page is open.
- "Ask AI failed": try again in a moment. If it keeps failing, check that an AI provider key or AI credits are set up.
- "Nothing to import": the zip has no .md, .markdown or .txt files.